
a. Download an Empty template
In case you want to create a new group from scratch.
Opening the spreadsheet, you will find that headers are already added. Each column corresponds to a 'personal information' field, also found in Groups & Users.
One row equals one user: ![]() First name, Last name, Password, and Email cells are mandatory for successful user import.
First name, Last name, Password, and Email cells are mandatory for successful user import.
The system warns about missing mandatory details:
![]()
All other details are optional.
Some details are defined by a number, e.g., in the Privilege (J) column, entering '8' creates a Learner, '4' creates an SP user.
Scroll down to the bottom of the page for more codes.
Once you are finished with entering user details, go to Step 2, select Create a new user account for each row and import the excel sheet.


The name of the excel file defines the group you modify in the system. To modify the same group you have started with, leave the name of your downloaded file unchanged. Otherwise, there will be an entirely new group created with duplicate users.
You can modify any detail of a user in batch, except for email addresses.
Modifying Email Addresses
In case you modify the email address for a batch of existing users, the system will duplicate the existing users instead of modifying their email addresses.
Note
Dates entered in the template need to be in the following format: YYYY-MM-DD. (Applicable when entering SP details.)
After saving, go to Step 2, select Update existing user account, and import the spreadsheet.
If you select Create a new user account for each row here, the system will duplicate the users who were already in the User Manager.
Overview (Step 3)
After uploading your template, you can review users in Step 3 to make sure you are adding or modifying user details the way you wanted to.
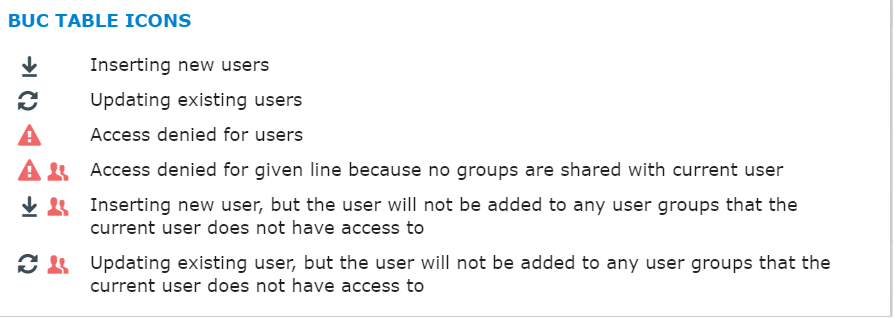
Most of the time, users will have either of the following icons displayed in their row:
![]() Inserting new users
Inserting new users
![]() Updating existing users
Updating existing users
Go back to Step 2 if you need to correct any details or click Finalize when you are ready.
Finally, Step 4 displays the summary of changes. Click Done to be redirected to Step 1 at BUC.
Upload photos
User profile pictures can also be uploaded along with user details.
- Use an excel template retrieved from Step 1
- Gather the photos you would like to upload in a .zip file.
- Enter the precise name of the photos to each user in the User Photo column (M) like Photo.jpg
- Save your spreadsheet and close it.
- Select all the photos and the spreadsheet and make a compressed folder (.zip format).
- Go to Step 2, select either options, and import your .zip file.
Include only .jpg/jpeg photos in your .zip file. Uploading other file formats in BUC will not be successful.
Make sure to enter the name of each file in the BUC spreadsheet exactly how the file is named in the .zip folder: paying attention to upper and lowercase letters.
However, always enter the file format in lowercase letters for successful file upload.
Some example spreadsheet entries:
Correct: FILENAME.jpg, filename.jpg, FileName.jpg, FiLEnAme.jpg
Incorrect: FILENAME.JPG
Overview
Content Tools