With CAE LearningSpace's latest integration solution, you can remotely use rooms to organize and record OSCE encounters: have your SPs host their portrayal of a scenario and allow your learners to fill out their pre- and post-encounter checklists as you would do in the physical rooms of your training center.
From now on, you can integrate and use Zoom services through CAE LearningSpace and create virtual rooms for hosting scenarios to particular learners at scheduled appointments.
This page will explain
- how to set up your Zoom account
- how to integrate Zoom into CAE LearningSpace
- how to set up and manage virtual rooms
The guide will also recommend the most fitting Zoom subscription plan to choose for OSCE Teleconferencing purposes that can also be adjusted to the needs of your organization.
Before starting the setup process, make sure you have as many email addresses ready as the number of virtual rooms you would like to configure. The number of virtual rooms you can configure for OSCE Teleconferencing purposes depends on your Zoom subscription plan. Aside from our recommendation, you can also check the subscription plans at Zoom’s Plans & Pricing page: https://zoom.us/pricing
Create Your Zoom Owner Account
Visit zoom.us and create a new owner account by signing up.
Provide the email address of the Zoom account.
This email address will serve as the primary address of your Zoom account. Virtual rooms will be organized under the owner account registered with this primary email address.
Anyone who has access to this email account, and consequently the Zoom owner account can
- upgrade to a new plan (change the number of hosts)
- see and copy the API key and secret
- manage the type of each user in Zoom: Licensed or Basic type.
You will be sent an activation email to your account email address.
Go to your mailbox to verify your email: click Activate Account, or paste the URL provided in the email into your browser.
You will be redirected to Zoom to continue your sign-up process.
Under Account Info, you need to provide your name and set a password.
Your password must be at least 8 characters long, containing at least one letter, one number, and both upper and lower case letters.
The password cannot contain only one character or consecutive characters.
Click Continue.
Optional In case you would like to share the account ownership with other colleagues, invite them on the Invite Colleagues page. The will receive an activation email to verify their email addresses.
Otherwise, click Skip this step.
Optional Launch a test meeting.
Click on Go to My Account if you do not want to start a test meeting right now.
You will be redirected to your profile where you can find your account number, personal meeting ID, account information and meeting capacity.
Upon registration, you will have a Basic account that you will need to upgrade in order to register your virtual rooms as users under your Zoom account.
Before upgrading your account, you need to obtain the API key and API secret from your Zoom account to make CAE LearningSpace communicate with Zoom.
Obtaining the API key and secret is entirely user friendly in Zoom and CAE LearningSpace likewise:
Stay on your Profile, and in the side menu on the left, click on Advanced to display further options.
Click on App Marketplace.
On the Zoom App Marketplace page go to the Develop drop-down on the left and open.
Click on Build App.
On the Choose your app type page, find JWT.
JWT is a tool that generates the API Key & Secret you need for integrating Zoom services into CAE LearningSpace.
Click Create to generate your API Key & Secret.
A window pops up where you need to name the new JWT application you are creating.
In the example, we are simply naming the new application after CAE LearningSpace.
Click Create on the pop-up to continue.
You will be directed to the Information page of your new JWT application where you need to administer further details such as provide the name of your organization and the Developer Contact Information.
Developer Contact Information can be the same as the account owner’s information.
Once your details are P Saved, click Continue.
You will find your API Key & Secret on the App Credentials page.
Copy the API Key and the API Secret. Use the Copy option at API Secret if you do not want to display it.
Now that we have the app credentials, we can enable the Zoom Telemedicine module in CAE LearnigSpace.
Log into CAE LearningSpace (with Administrator privilege).
Go to System.
Select the Security tab.
You will find the new Telemedicine Module at the bottom of the page right under the system password.
Switch on the new module to display Zoom settings.
Paste the API key and API secret in the corresponding fields.
Click on Save & Test Connection to connect to Zoom.
CAE LearningSpace informs you about the successful or failed connection at the top of the page.
Upgrade Your Zoom Account
When you sign up for free with your primary email address, you only have access to the Basic features of Zoom.
You can check your subscription status at the User Type field on your profile:
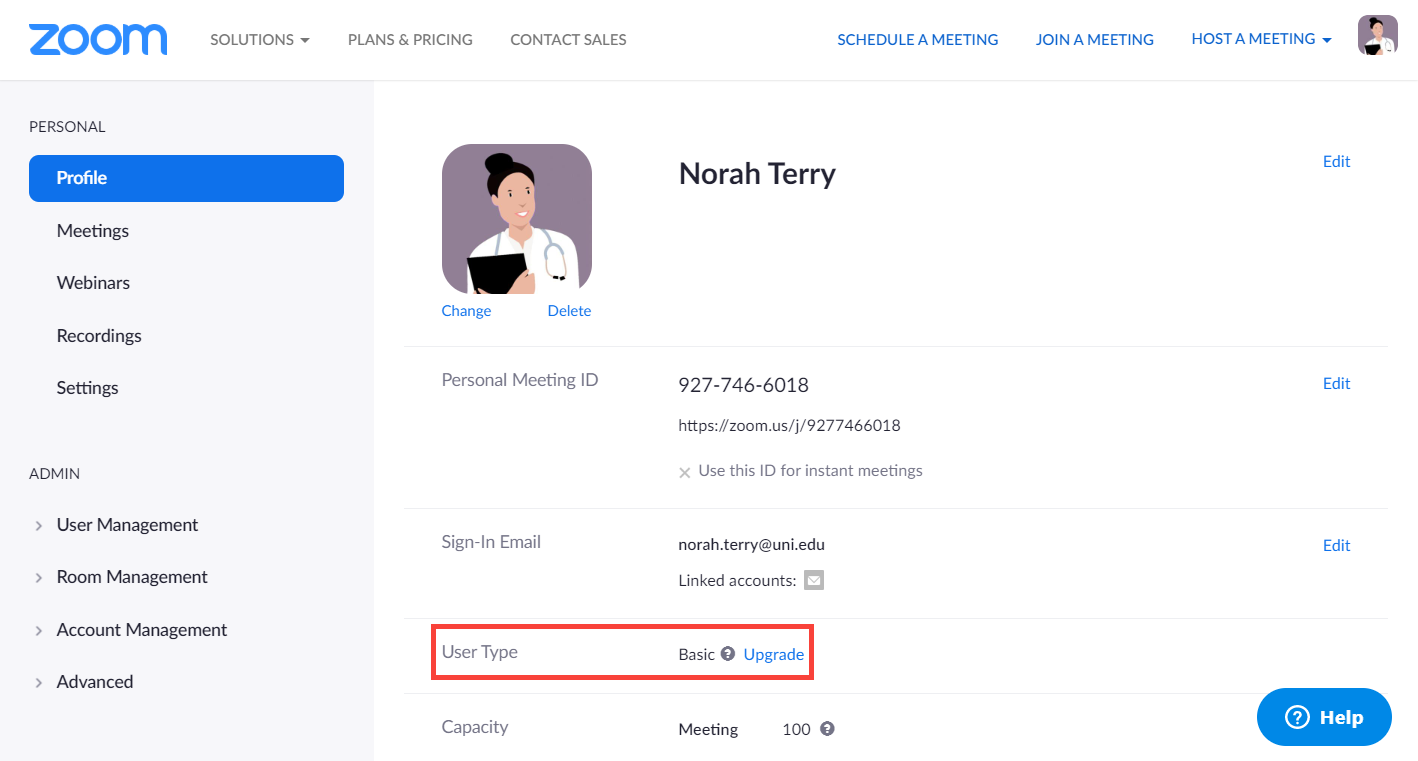
A Basic subscription does not
- support Zoom service integration into other applications
- contain cloud recording
- and restricts the duration of meetings to 40 minutes if there are more than three total participants at the meeting.
In order to use Zoom services within CAE LearningSpace after completing the API setup as described in the previous part, you need to upgrade your account and include as many hosts in your subscription plan as many virtual rooms you would like to configure in CAE LearningSpace.
- Upgrade your account to Pro if you plan to configure 9 virtual rooms or less;
- Upgrade your account to Business if you want to configure 10 or more virtual rooms.
Virtual room configuration in CAE LearningSpace will be explained in the following.
Choose one of the recommended plan.
Select the number of hosts you want to purchase.
Zoom automatically calculates the monthly and annual fees afterwards.
After selecting the billing schedule, scroll down to the bottom of the page and click Continue.
On the Payment tab, provide the Billing Contact information, and credit/debit card information at Payment Method.
At Billing Contact, the total employee count of your organization is required to continue.
Once you are finished, click Upgrade Now. You will be presented with an Order Summary.
Click Confirm to complete your purchase. Zoom will confirm that your account has been upgraded successfully.
Virtual Room Configuration
(=CAE LearningSpace handles Zoom User Management when setting up a new room.)
Create virtual rooms in CAE LearnigSpace after you have successfully connected to Zoom after setting the API key and secret in the Security tab.
By creating virtual rooms in CAE LearningSpace, your Zoom owner account will automatically send activation emails to each email address to verify the email address of each virtual room and to add them as users to your primary Zoom account.
After verifying the virtual rooms, the room’s status in CAE LearningSpace will change to “Verified”, meanwhile in Zoom, you can set the virtual rooms up as Licensed users. If all these settings are complete, your room can be added as a station for an event created with Advanced Scheduling. You can schedule your learners and add SPs as would do using a physical room.
You can organize virtual OSCE sessions; your SPs will be allowed to start hosting the scenario they are portraying and allow scheduled learners to access the virtual scenario according to their timeslot assignments.
Enter System from the Dashboard, and go to Rooms.
Click Add New Room. Enter the name and description of the new room which are required to continue.
Check the new Virtual Room checkbox included under the required fields.
Click Add.
Instead of the usual setting options, only a few fields will appear:
New Registration email field: The email alias of your virtual room goes here.
Zoom will send an activation email here to add the virtual room as a user under your primary Zoom account. Then the virtual room can be Licensed to enable hosting from the user/virtual room registered with this email alias.
This setup is necessary to enable SPs to host and learners to join a meeting through CAE LearningSpace.
New Status fields: Shows the status of the room whether the activation email was verified or not that was sent by Zoom to the email alias Once the Zoom activation email that was sent to the email was verified
The Location drop-down will also appear as an optional setting in case you would like to categorize your virtual room e.g. by campuses.
After providing the Registration email address, click Save.
Zoom will automatically send a user activation email to the email alias of the room.
Check for the activation email in the mailbox of the provided email alias.
Click Activate Account.
You will be redirected to Zoom to provide the name and password of the new user/virtual room added under your primary account.
The Room Settings popup will warn you if the Telemedicine module is currently switched off in CAE LearningSpace.
Every virtual room that has been previously verified will appear as not verified if the Telemedicine Module is switched off.
When switching back the Telemedicine Module on the Security page, the API key and secret will auto-populate in each field. Without changing anything, click Save & Test set up the connection to Zoom Services again.
Click Add New Room.The Room Settings popup will contain extra fields:
Registration email: email alias that needs to be provided so that Zoom can activate the virtual room as a user in its system.
Status: Not verified until the activation email of the room is not verified by the Zoom account owner.
If the Telemedicine module is currently switched off in CAE LearningSpace,
Overview
Content Tools