For an introduction to Advanced Scheduling, please visit the How to Understand Concepts within Advanced Scheduling page.
You can assign SPs to your scheduled Events if you are not planning to use simulators in your scenarios.
Make sure that you have an SP group assigned to your Activity.
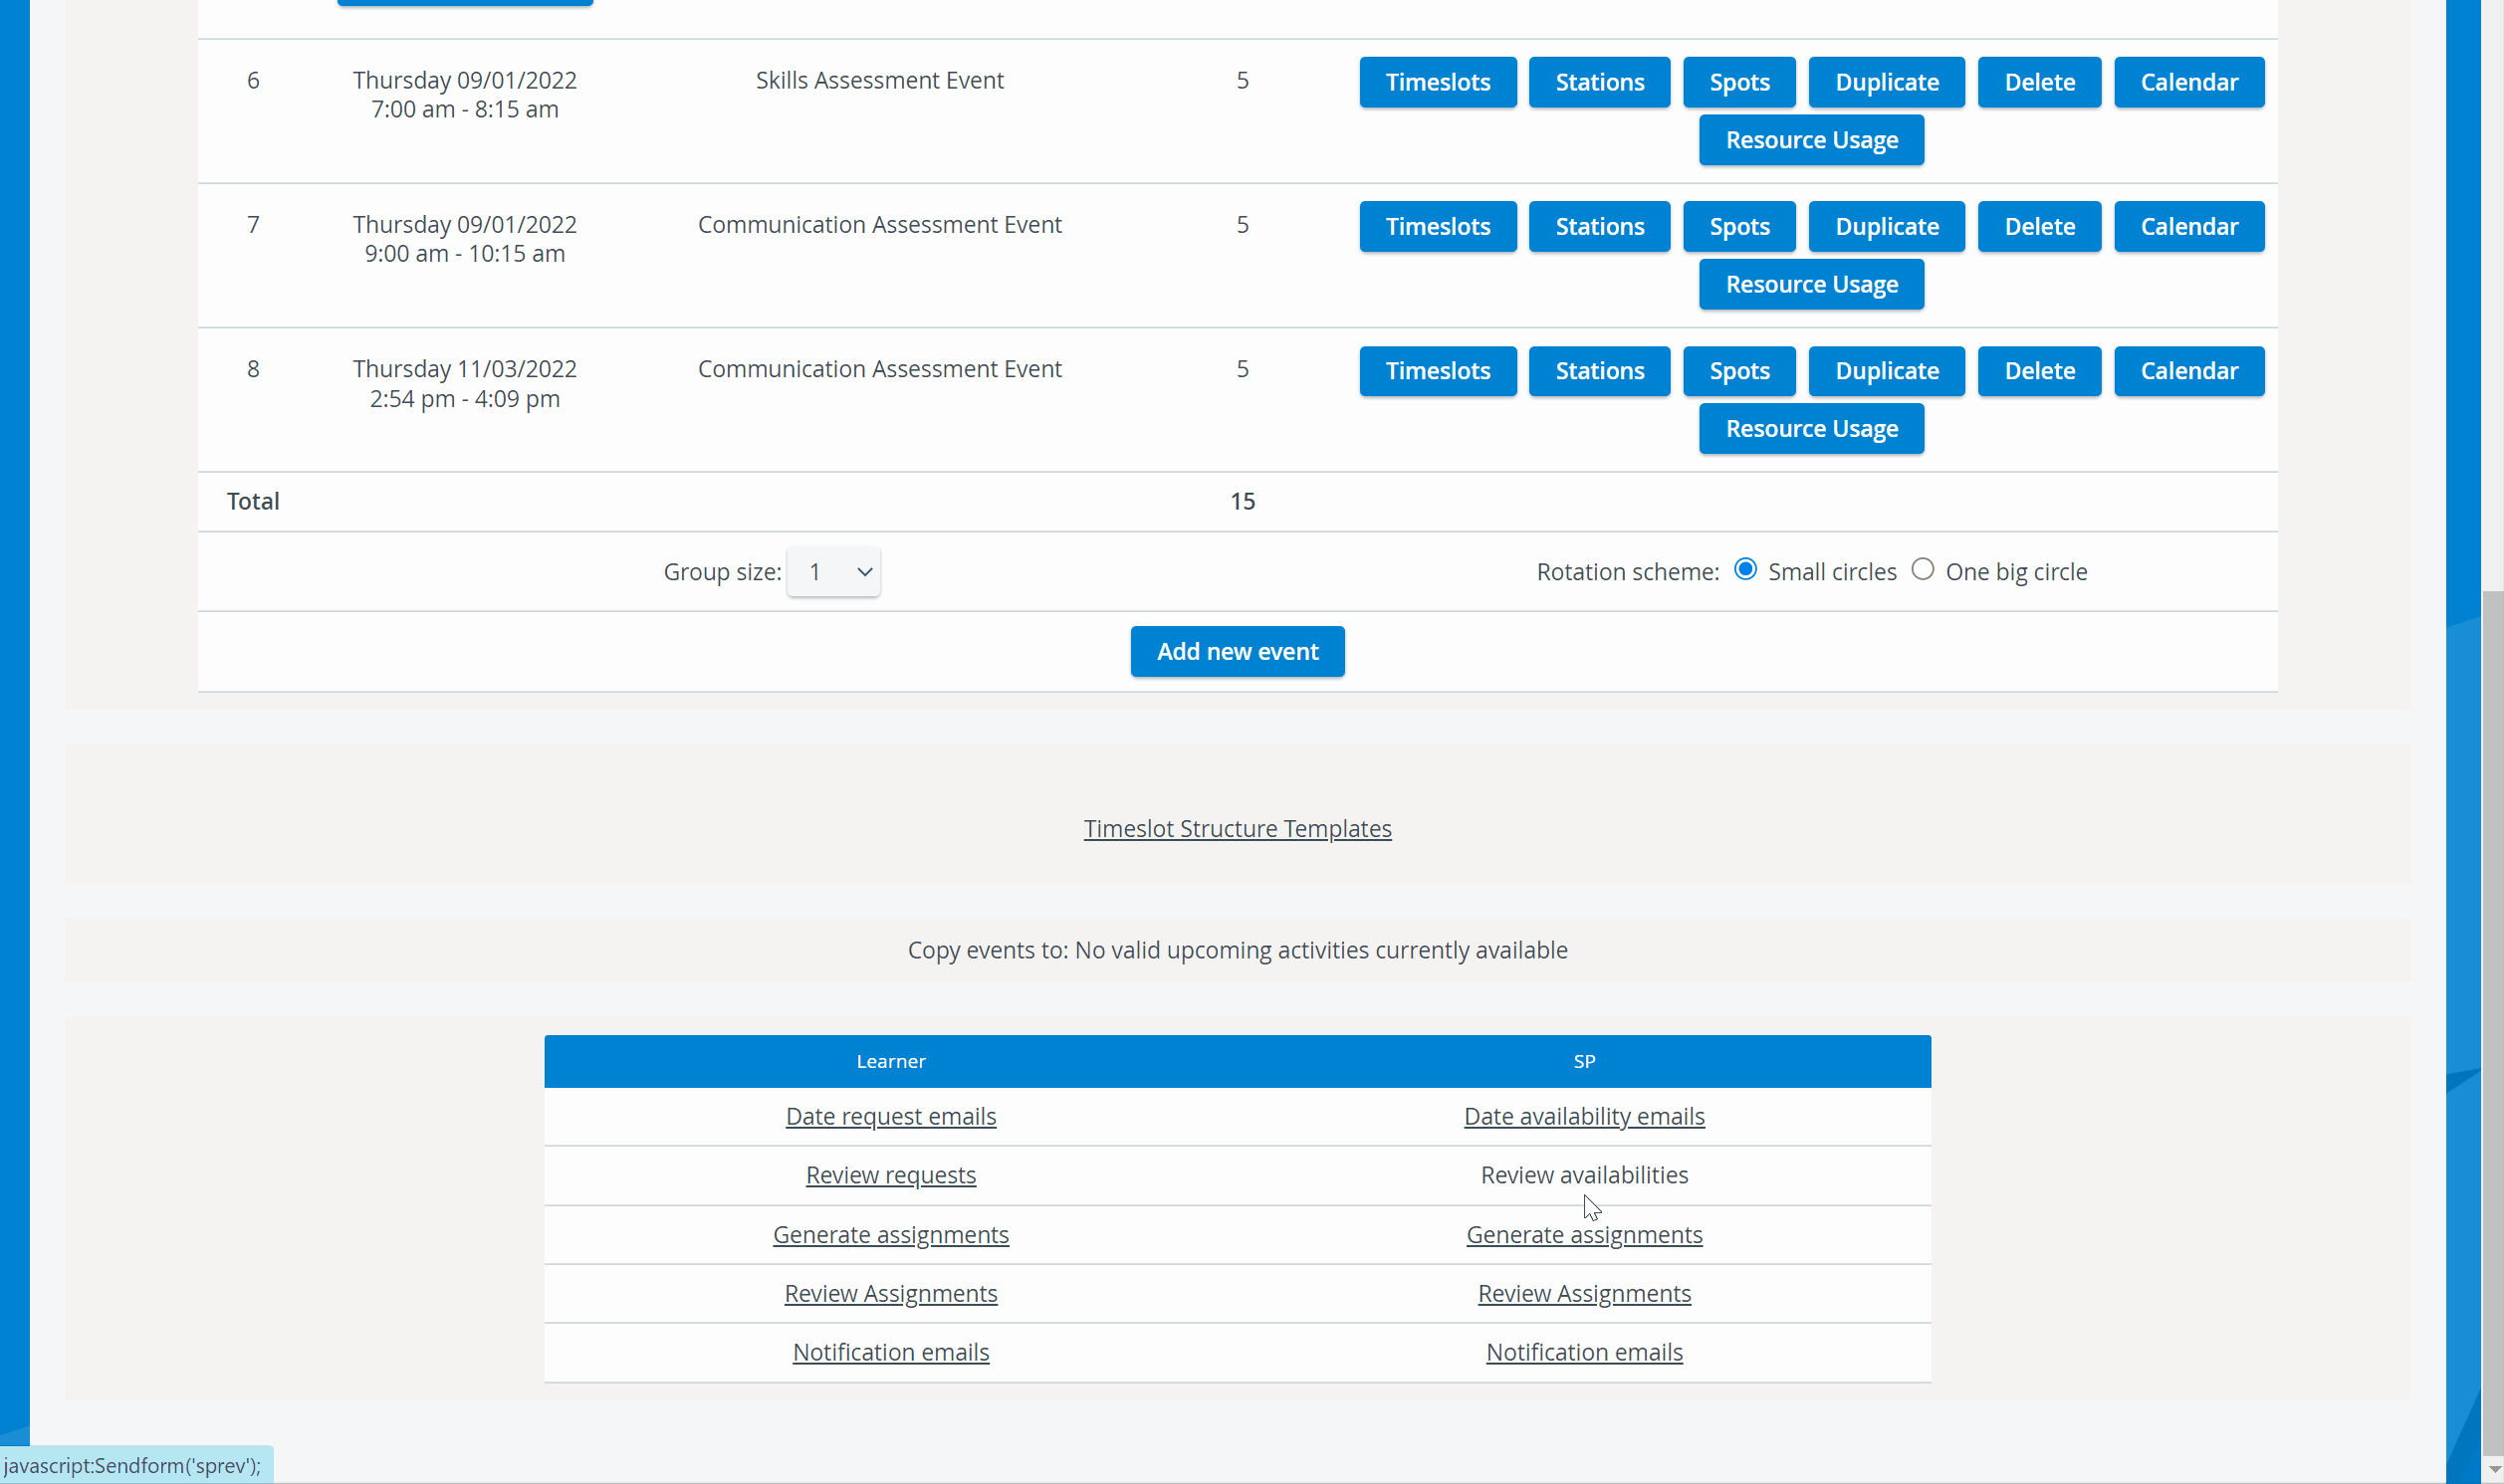
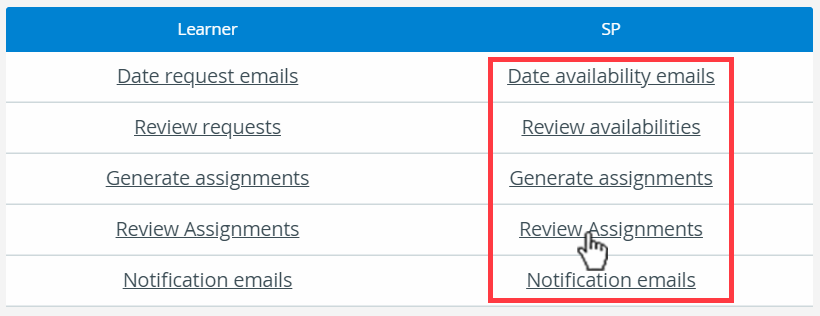
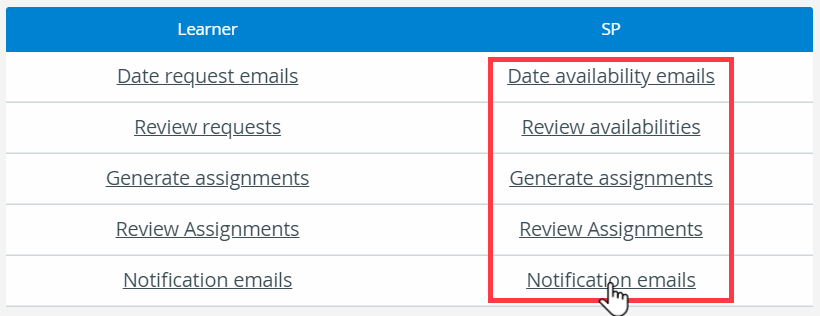
There are 5 options located at the bottom of the Activity Scheduler page that can help you with SP scheduling:
- Date Availability Emails: You can send out emails to the SP group of your selected Activity to find out about which SPs are available.
- Review Date Request Emails: The system summarizes the submitted availabilities on the Review SP Requests page.
Generate Assignments: Assigning SPs to the Cases of your event takes place here. You can use the collected appointment requests too if SPs already submitted their availability through the on the Date Availability Emails.
- Review Assignments: You can view the latest SP assignments on this page. Generated assignments are not final; you can always reschedule SPs on the SP Assignments (Generate Assignments) page if needed.
- Send Notifications (optional): Use the Send Notifications option to send out emails to SPs confirming their schedule or informing them if they were not assigned.
Tip
In Case you haven't used Date Request Emails or you haven't received appointment requests from all of your SPS —or any of them at all—the system generates assignments randomly.
Sending Date Availability Emails
- Access the Activity Scheduler page of a selected Activity.
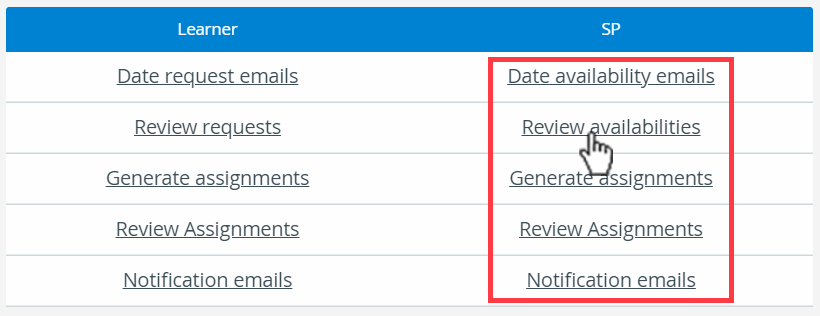
Scroll down to the bottom of the screen to the panel with the Learner and SP columns.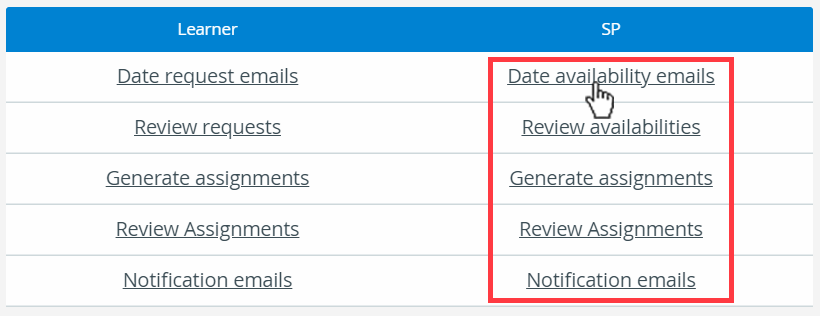
Click on Date availability emails in the SP column:
You will be redirected to the Scheduling (SP Date Availability Emails) page where you can set up your email and send it out to your SP group.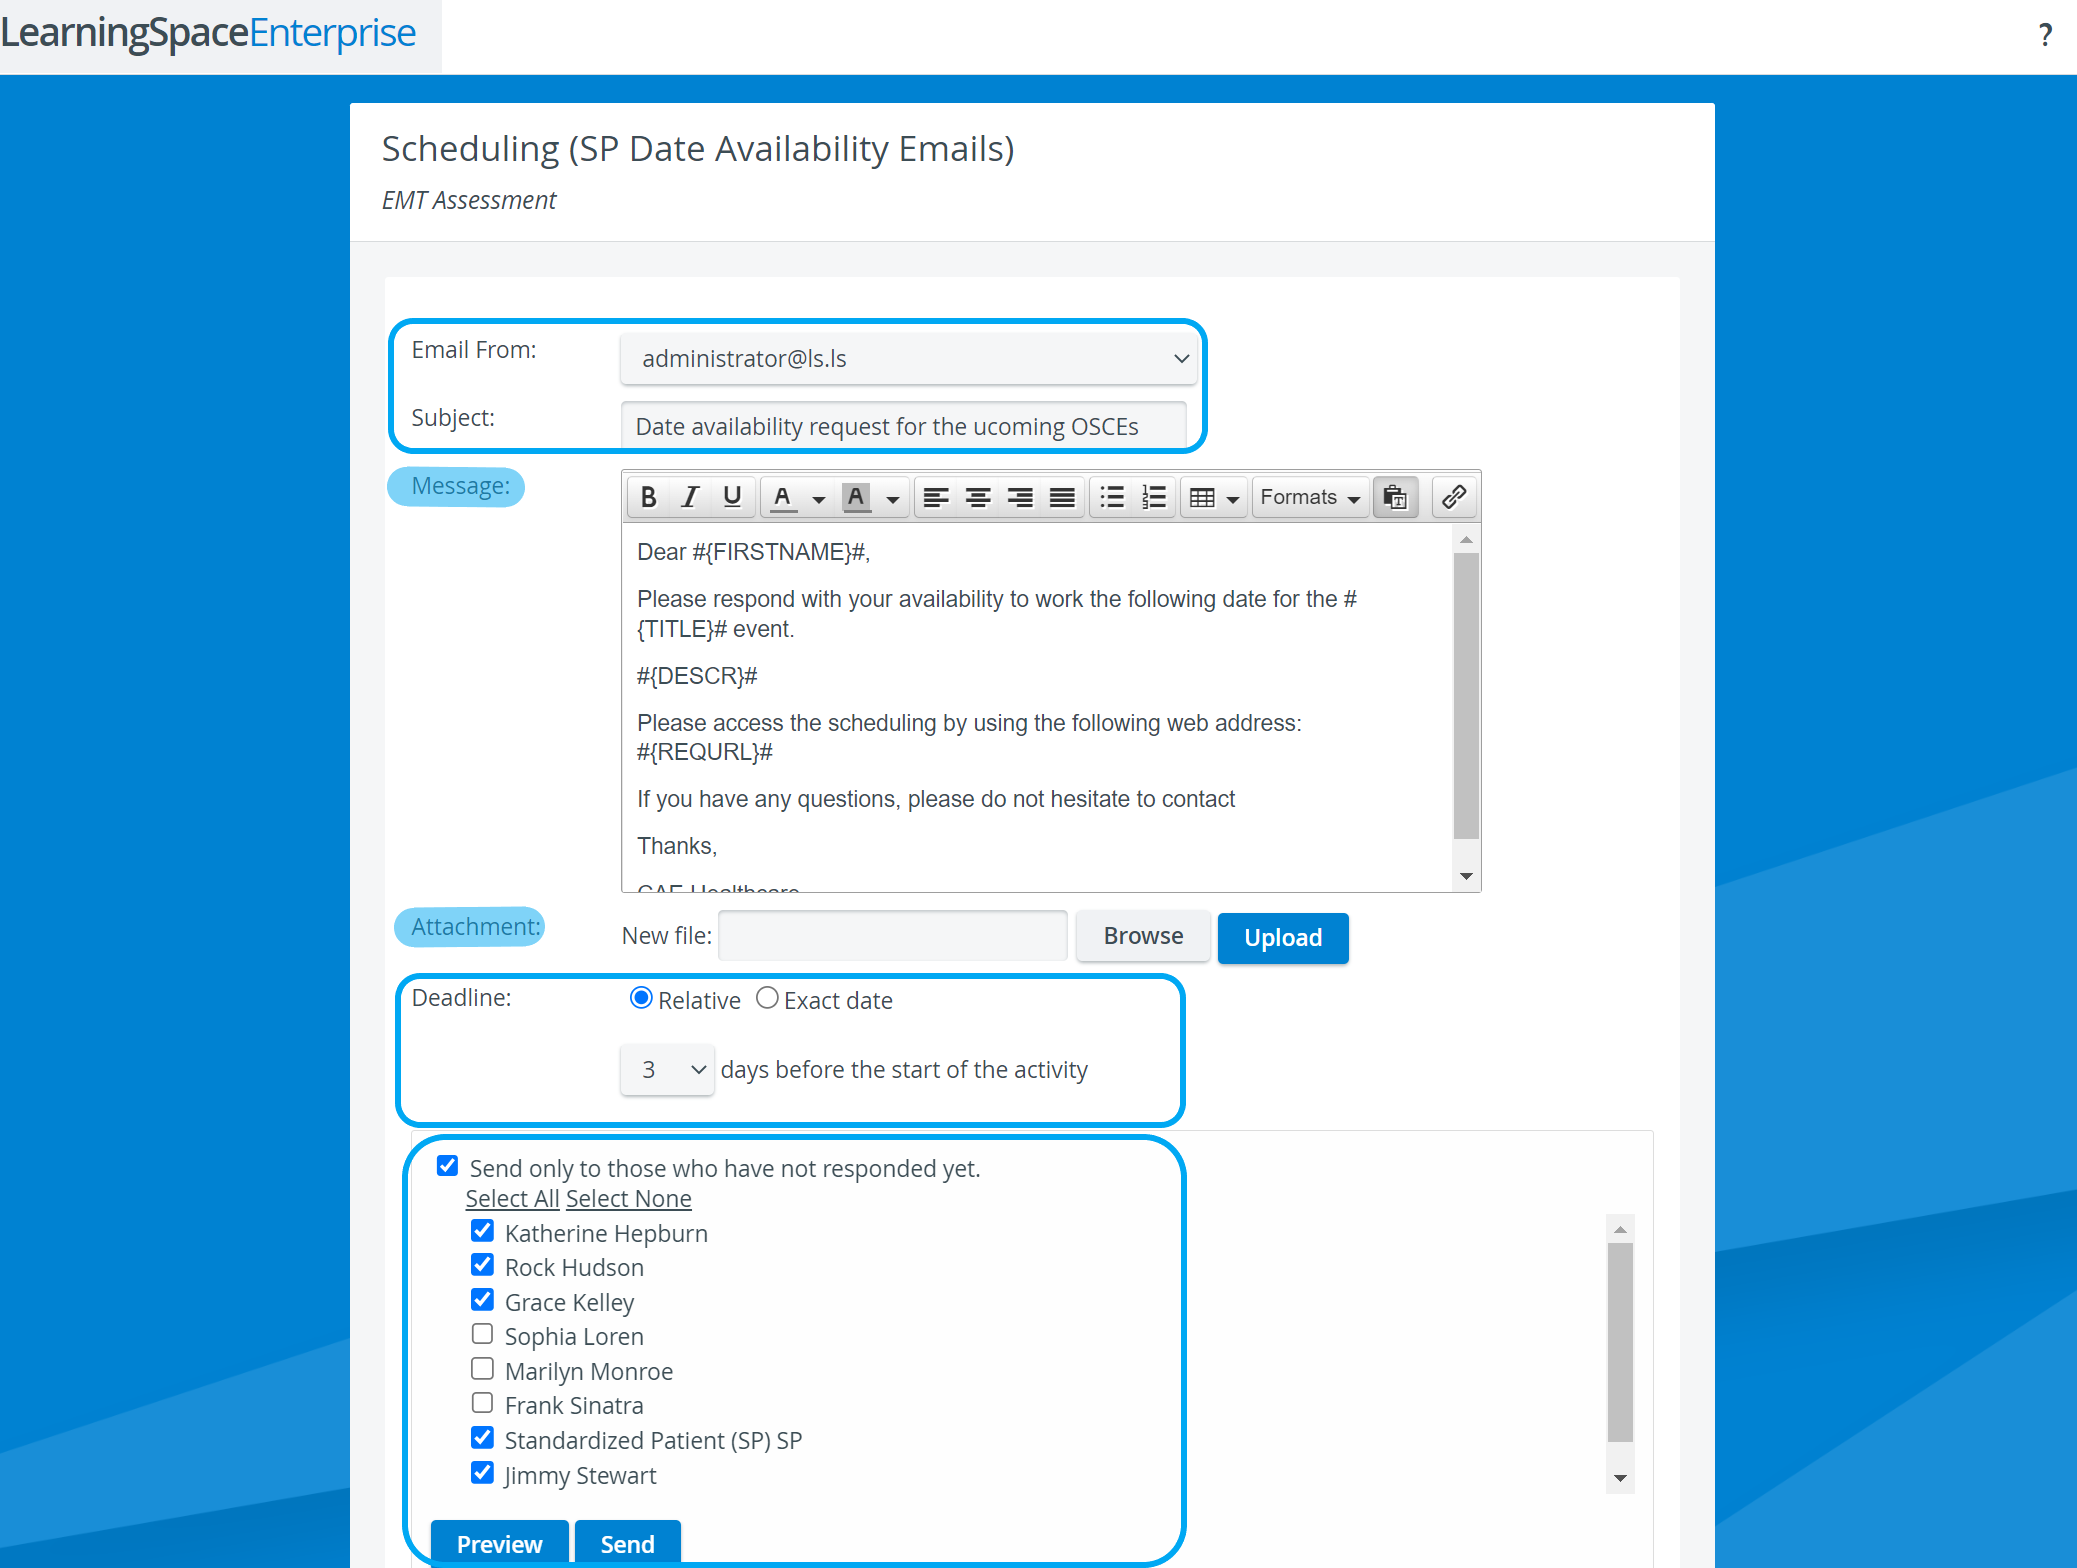
Select a from address in the Email From drop-down.
To set up further from addresses, go to the Emails tab in System Manager.- Enter the subject of your email in the Subject field.
Edit the message body of your email in the Message field.
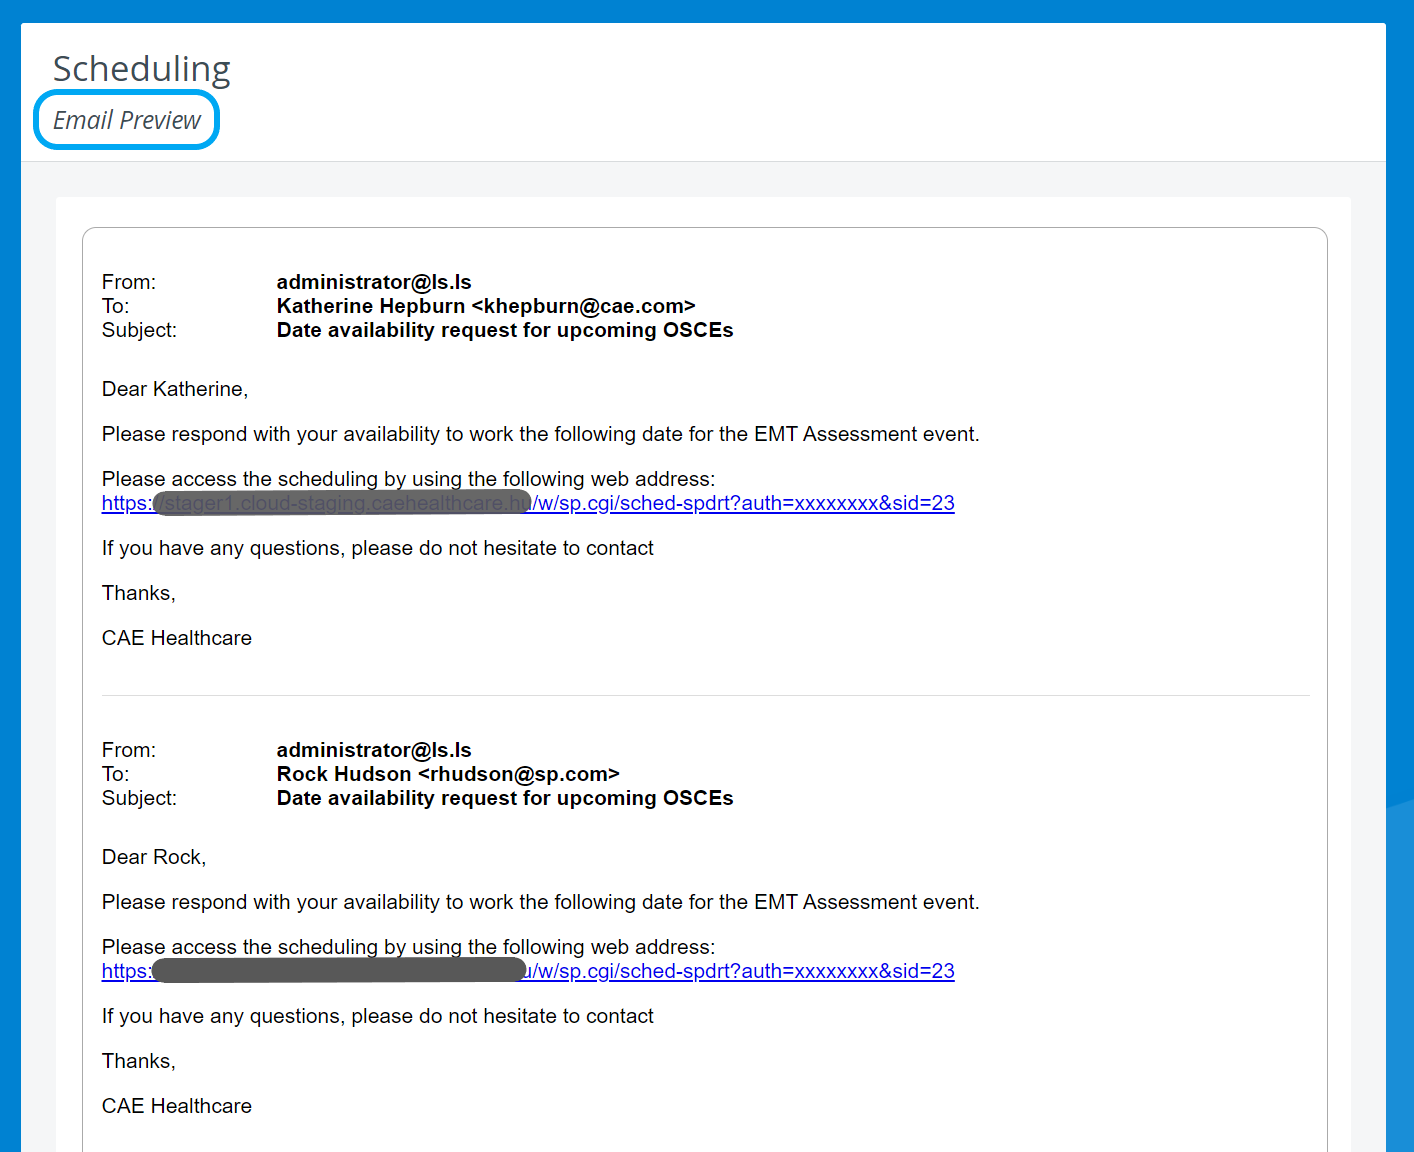
If the SP availability email template was set up in System Manager, you may notice that the message body contains snippets of text surrounded by hashtags and curly brackets: These snippets are referred to as merge tags in the system. Merge tags personalize the emails you send out to your recipients:
the system automatically replaces the merge tags with the corresponding unique data of your recipients in the body text.
To apply merge tags, set them up and save them in the default email templates in Emails—click on the System Settings button at the bottom of the page to be redirected.- Use the Attachment field to attach a file:
- Browse for a file on your computer.
- Once selected, Upload your selected file.
- Your attachment will appear as a link in the Attachment section which you can open for viewing.
- You can also Remove your attachment.
- Set up a Deadline for SP feedback:
You can set up the response deadline relative to the start date of the entire Activity—
 not the event.
Tip
This option can be useful while you are planning upcoming (not yet running) Activities.
- Switch to Exact date if your Activity is already running to select any deadline of your choice.
Optional: Check the Send only to those who have not responded yet box.
Tip
Apply this option if you are sending out date availability emails repeatedly and some of the SPs have already responded.
- Click on Preview to see how your email will be displayed to each of your recipients. The Email Preview page displays your message by each user.
- Return to email editing with the top-left back arrow.
Click Send to send out your email.
After you have sent out the date availability emails, the system will log the time and date of sent emails: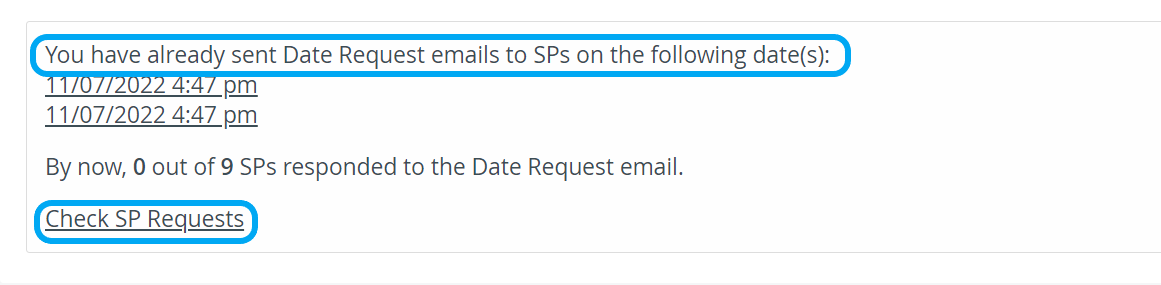
The system also counts the number of SPs who have responded to your request.
To see the details about your SPs' round selections, click on Check SP Requests.
Review Availabilities
Note
On the Review availabilities page, you can only view the cumulative list of SP requests submitted so far. To assign SPs to the event according to Cases, go to Generate Assignments.
- Go to the Activity Scheduler page of the Activity.
- Click Review availabilities in the SP column:
- You will be redirected to the Scheduling (Review SP Requests) page where you can view the date requests of each SP.
- To sort SPs by their time of Responding, or availability status select the corresponding radio button.
Generate Assignments
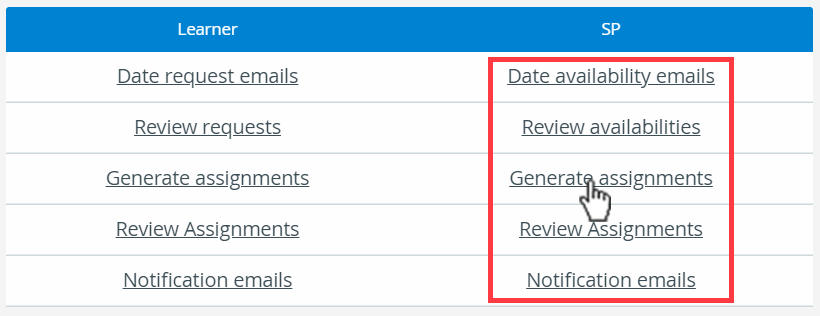
- Go to the Activity Scheduler page of the Activity.
- Click Generate assignments in the SP column:
- You will be redirected to the Scheduling (SP assignments) page where you can assign SPs to the event by Cases.
- Select an SP from the drop-down menus to assign them to a Case.
- If an SP confirmed they are available for the event, [x] is displayed at their name.
- If an SP is not available for the event, [-] is displayed at their name.
- If an * appears at an SP's name after selecting them, that means the SP has been already assigned to an other event taking place at the same time.
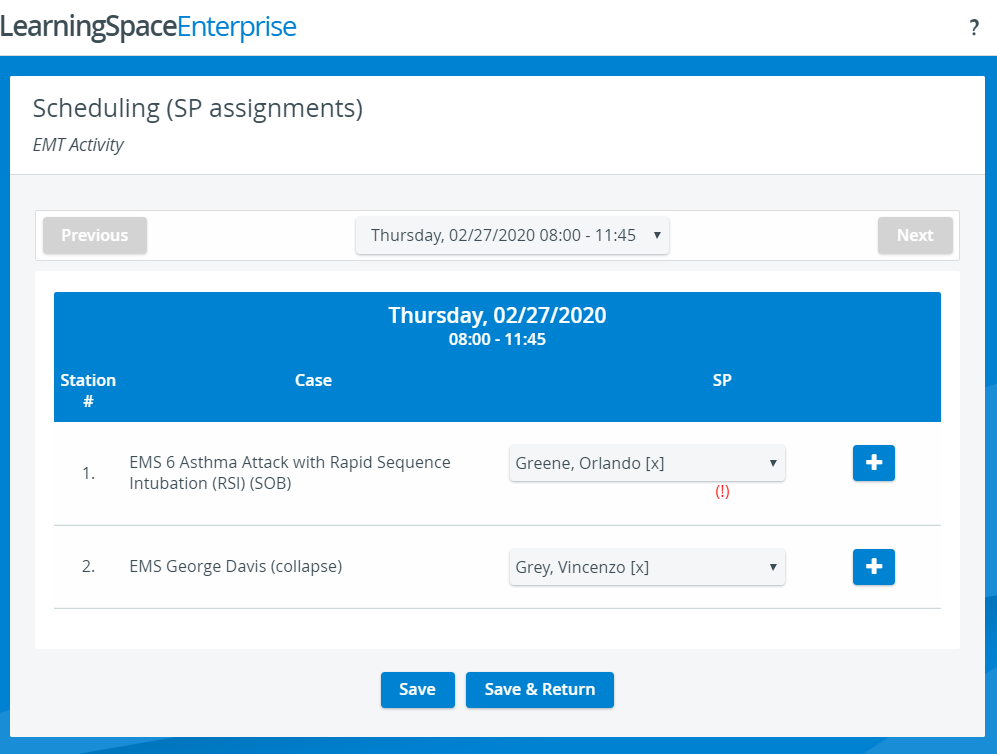
- A red exclamation mark
 may also appear if the SP has already had encounters with at least one learner participating in the event.
Hover over the exclamation mark to display the name of the learners who already worked with the SP during a previous scenario: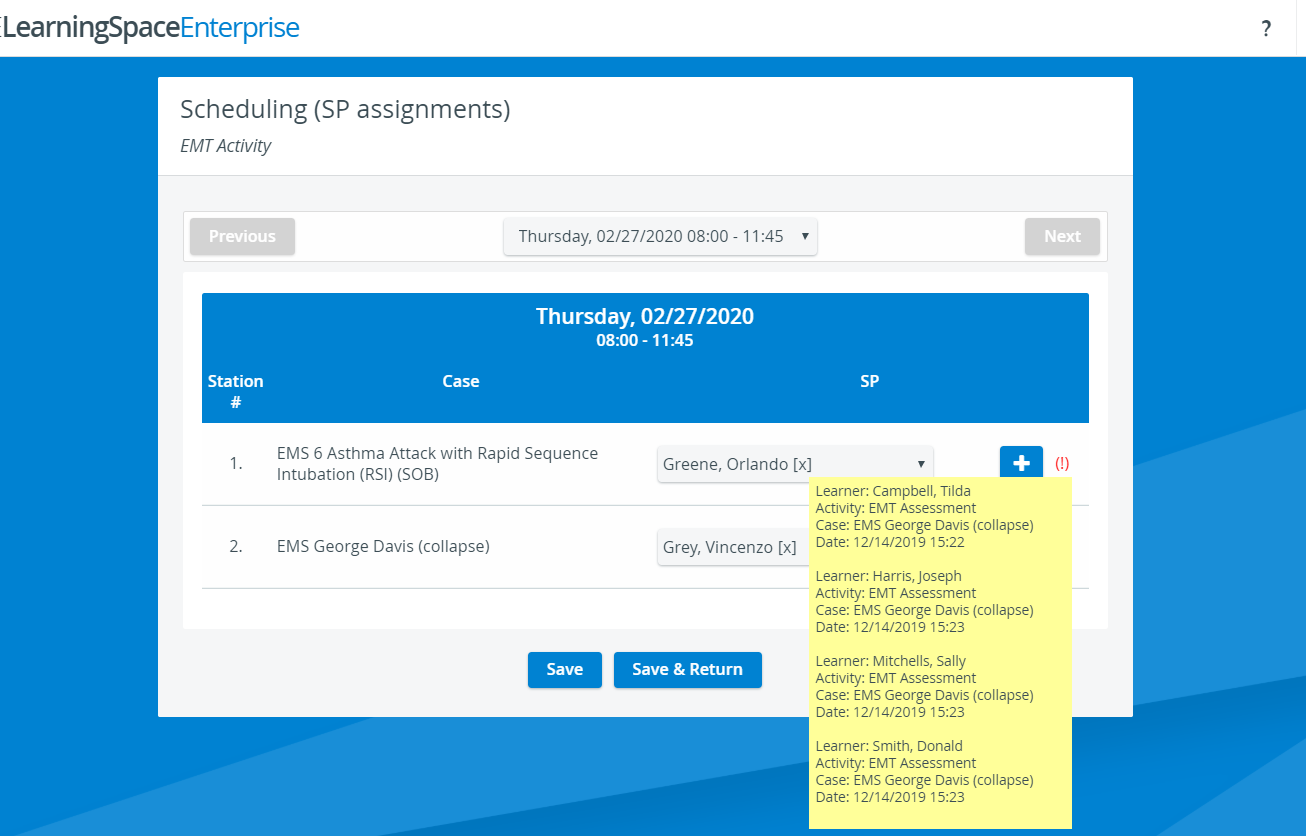
Click Save or Save & Return to save your assignment settings.
With Save & Return you will be redirected to the Activity Scheduler page.Confirmation Emails
To send confirmation to assigned SPs, go to Notification emails.
Review Assignments
- Go to the Activity Scheduler page of the Activity.
- Click Review assignments in the SP column:
You will be redirected to the Scheduling (Review SP Assignments) page where you can check the round assignment of each SP.
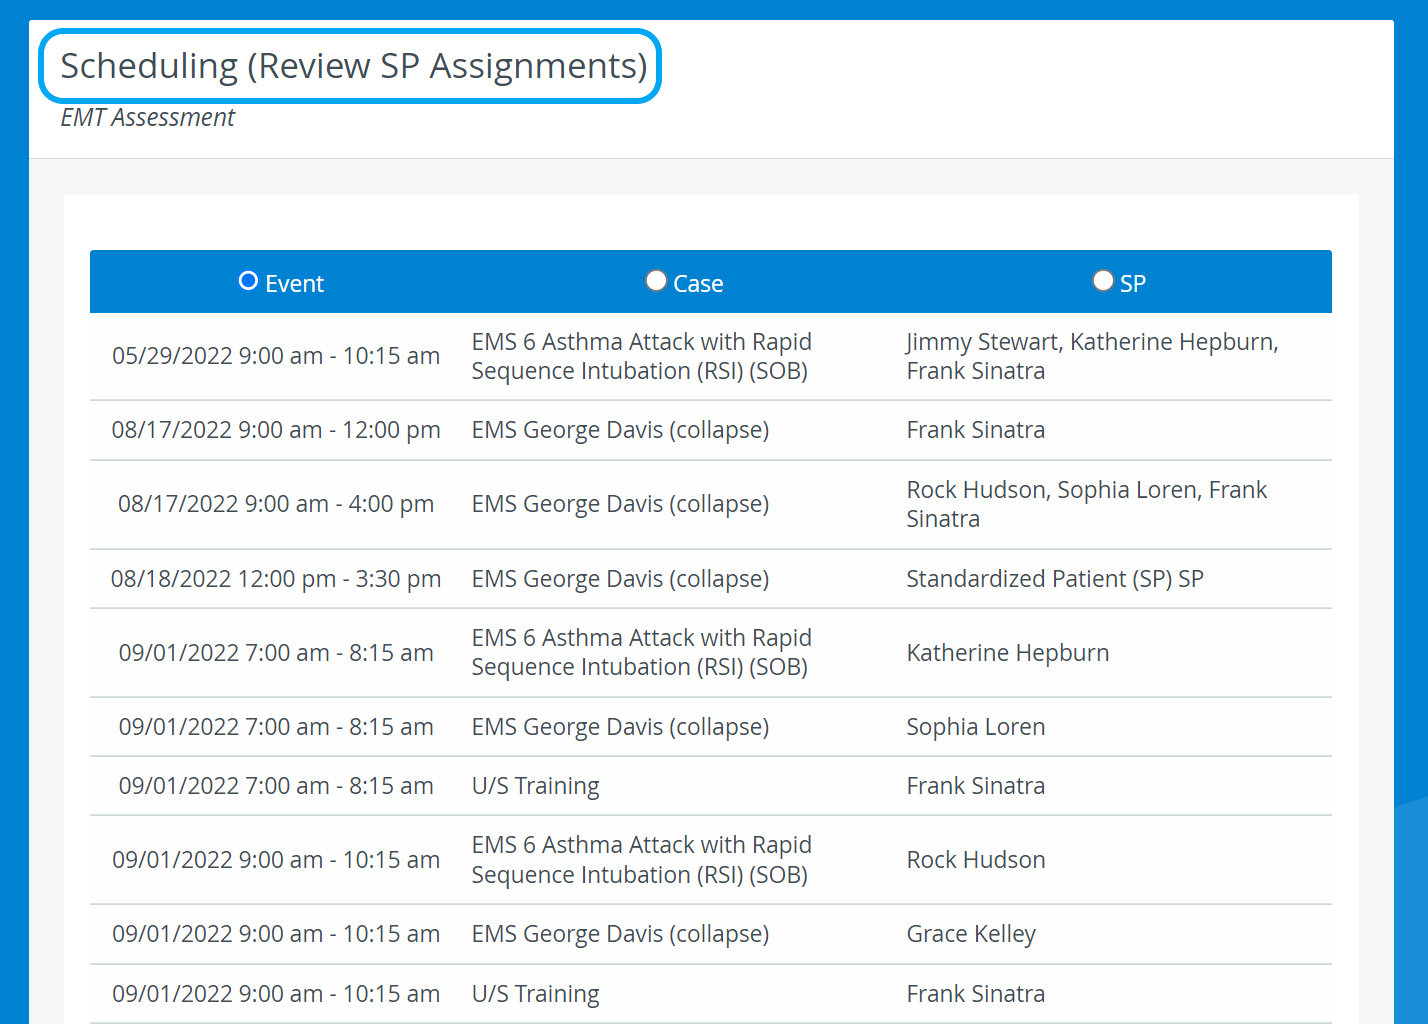
Note
By default, SP assignments are sorted by the Event dates and times. Select the respective radio buttons to sort the assignments by Cases or SPs.
Sending Notification Emails
- Go to the Activity Scheduler page of the Activity.
- Click Notification emails in the SP column:
- You will be redirected to the Scheduling (SP Notification Emails) page where you can edit the notification emails for your SP group.
Select a from address in the Email From drop-down.
To set up further from addresses, go to the Emails tab in System Manager.- Enter the subject of your email in the Subject field.
There are two kinds of emails to prepare for your SP group:
Note
For valid email setup, prepare the contents of both kinds of emails.
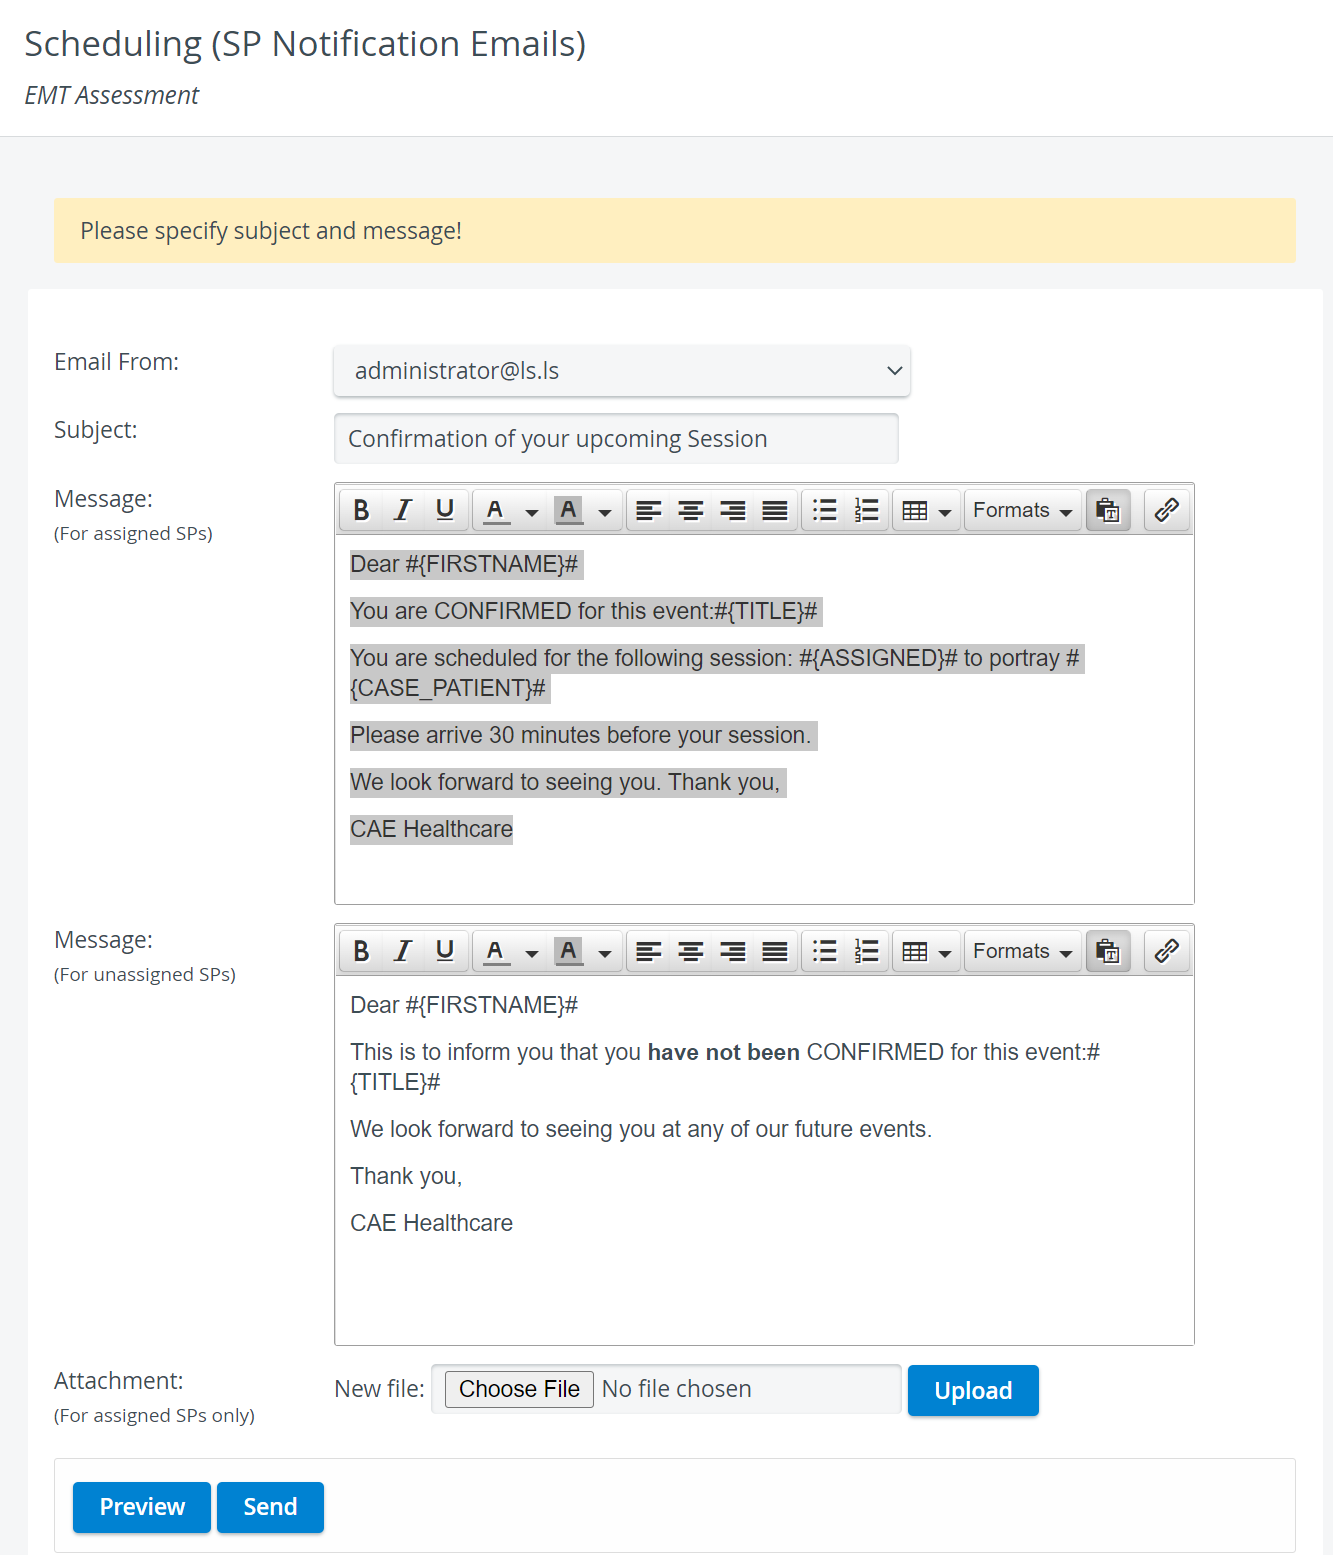
One for the SPs whose application for the event was confirmed; only those SPs receive the message who were assigned to one of the scenarios of the event.
Email Templates
You will find the template of this email under
- the name of SP notif. email (assigned) in the System manager,
- the Message (For assigned SPs) in Advanced Scheduling.
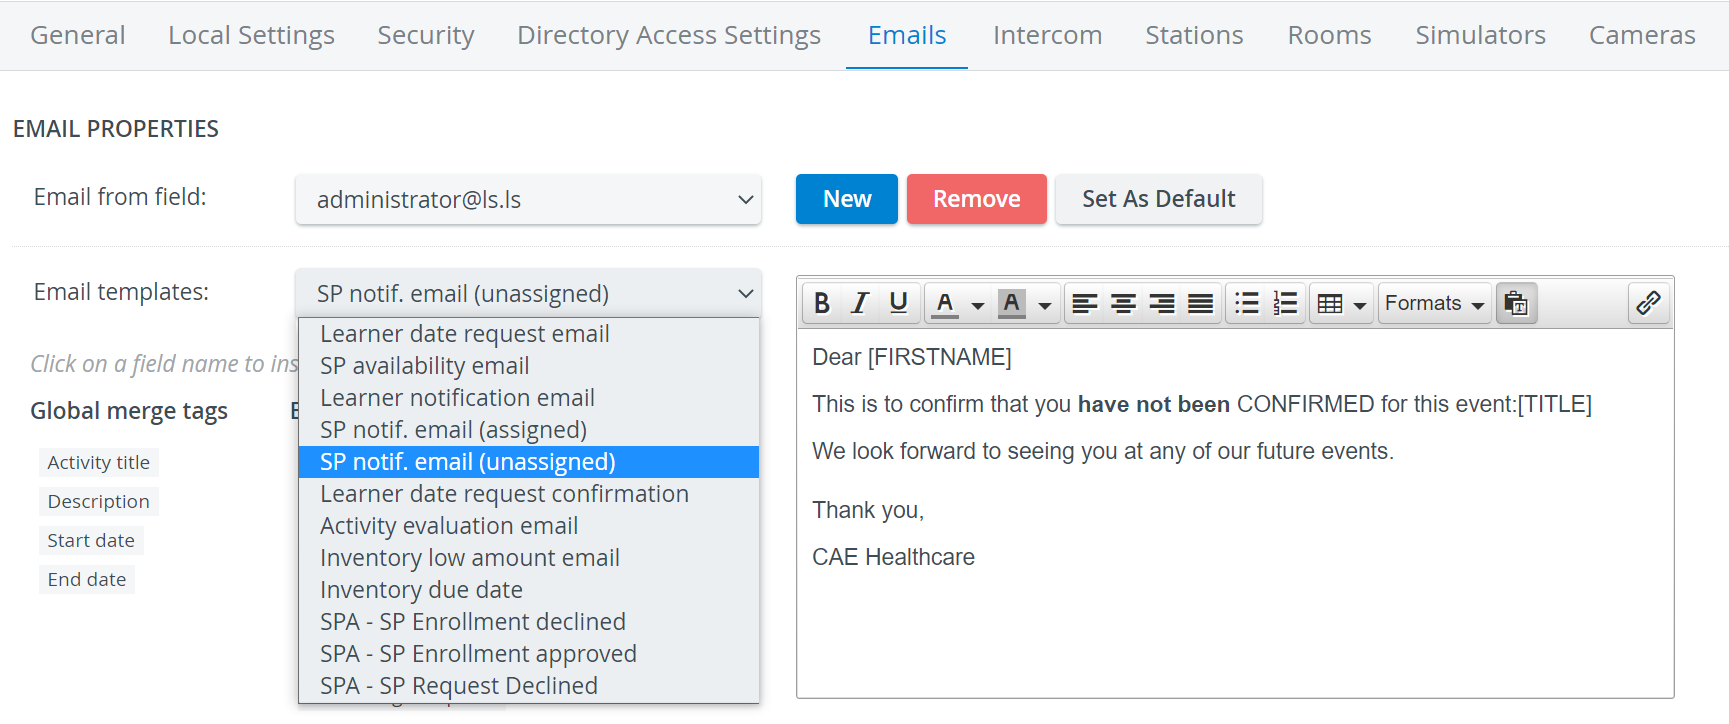
One for the SPs who were not assigned to the event; only those SPs receive the message who didn't get assigned to the event.
Email Templates
You will find the template of this email under
- the name of SP notif. email (unassigned) in the System manager,
- the Message (For unassigned SPs) in Advanced Scheduling.
If the SP notification email templates were set up in System Manager, you may notice that the message body contains snippets of text surrounded by hashtags and/or brackets: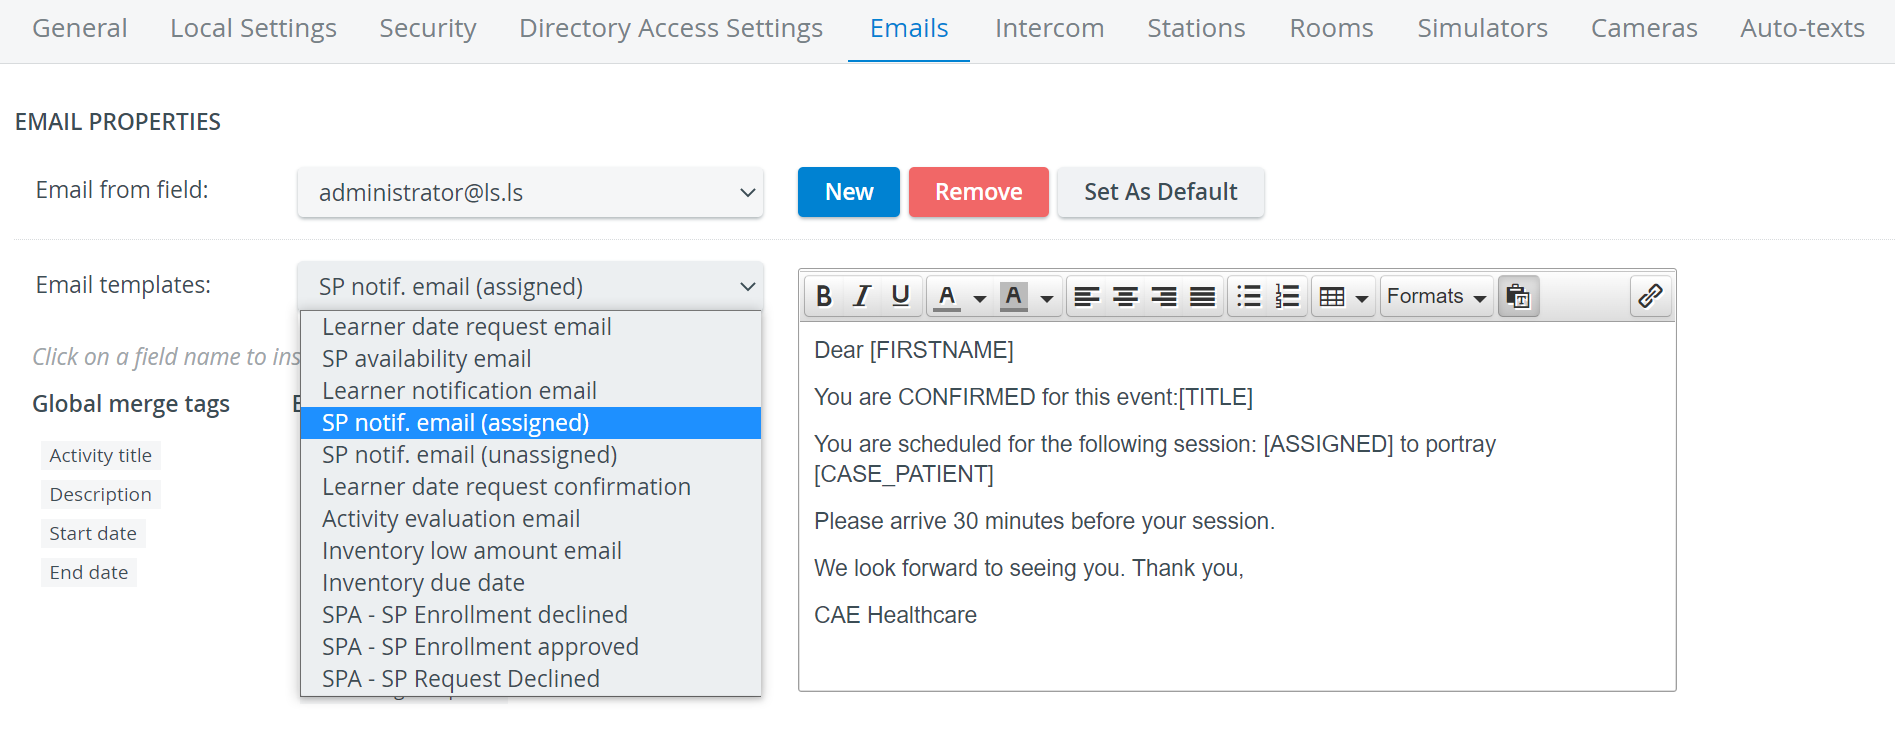
 These snippets are referred to as merge tags in the system. Merge tags personalize the emails you send out to your recipients: the system automatically replaces the merge tags with the corresponding unique data of your recipient once they receive your message.
To apply merge tags, set them up and save them in the default email templates in Emails—click on the System Settings button at the bottom of the page to be redirected.
- Use the Attachment field to attach a file:
- Choose a File from your computer.
- Once selected, Upload your selected file.
- Your attachment will appear as a link in the Attachment section which you can open to view.
- You can also Remove your attachment.
- Click on Preview to see how your email will be displayed to each of your recipients.
The Email Preview page displays your message by each user. - Return to email editing with the top-left back arrow.
Click Send to send out your emails.
Recipient Groups
No need to select a recipient group—each message will be sent out to the right SPs based on the assigment information of the event.
After you have sent out the notification emails, the system will log the time and date of the sent emails.
For further information, visit our Advanced Scheduling pages, and view our Activity Manager Training Videos.
Overview
Content Tools