This setup guide will walk you through the steps of how to set up your DeskCamera application and how to add DeskCamera to CAE LearningSpace as a camera feed.
1.0 Feature Announcement
From now on, you can deliver presentations straight from your personal computer without the need for expensive screen capture equipment.
CAE LearningSpace has integrated a third-party software solution, DeskCamera that captures your desktop and delivers screen capture to CAE LearningSpace's Recording module.
Once you have installed DeskCamera, your computer can be used as an IP camera. DeskCamera can push screen capture into CAE LearningSpace as a camera feed–just as if you were using a camera on the A/V network inside your institution–without the need for any expensive hardware equipment such as encoders or physical IP cameras.
With this new solution, virtual encounters can be recorded directly with CAE LearningSpace. You can also host presentations through the center management platform as part of your distance learning curriculum.
2.0 Requirements
2.1. Network Port Requirements
To have DeskCamera act like a camera stream, make sure to meet the following port requirements:
- CAE LearningSpace servers must be able to connect to the client computer running DeskCamera software on TCP port 8090 (OnVif Configuration)
- CAE LearningSpace server must be able to connect to the client computer on UDP port range between 22000 – 22999 and 31000 - 31999
- CAE LearningSpace server must be able to connect to the client computer on TCP port 554 (RTSP Streaming)
2.2. System Requirements
- Your computer needs a Static IP address (or reserved IP address)
- 6th generation Intel Core i5 processor or equivalent
- 1280x720p screen resolution or lower
- We highly recommend using the native display of your device, e.g., avoiding the streaming of an additional monitor connected to your laptop.
3.0 DeskCamera Installation
- License Activation: Please contact our support team at avs-support@cae.com to enable this feature for you.
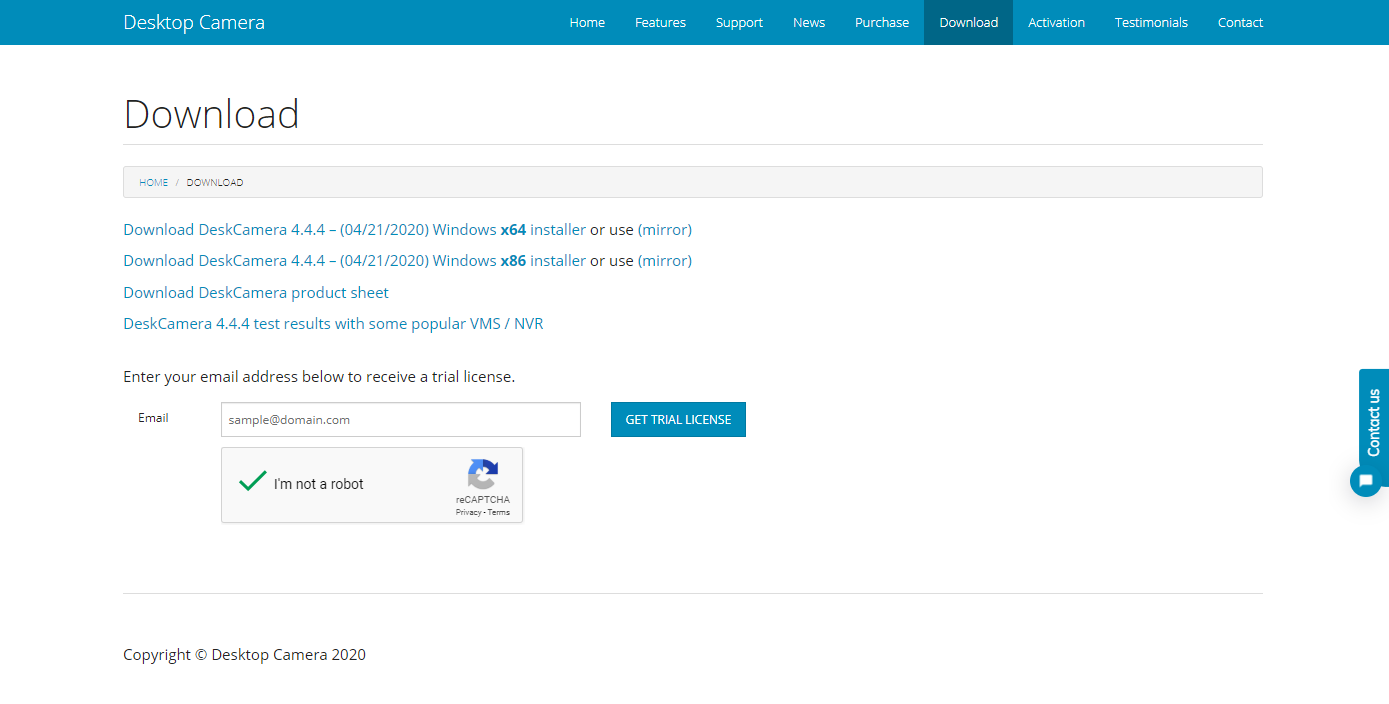
- Download the DeskCamera software from https://www.deskcamera.com/download/.
Provide an email address to request a trial license:
Note
DeskCamera's download page will include the latest version of the application. You might be downloading a more recent version of the application than the one included in this guide, but that will not affect the installation and setup process.
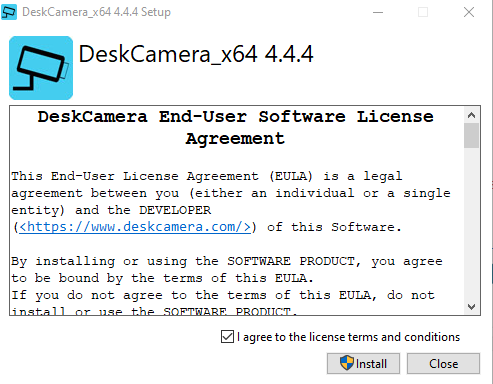
- Once the download is complete, start running the SetupDeskCamerax64_4.4.4 application.
- Start installation:
- Wait for the setup progress to finish.
- Restart your computer once the setup progress finishes.
- After restarting, the DeskCamera Setup Wizard opens.
Click Next.
- Choose a destination folder, then continue with Next.
- DeskCamera is ready to be installed.
Continue with Install if you don't need to review or change any setting. - Upon completed installation, click Finish.

- DeskCamera will launch automatically:
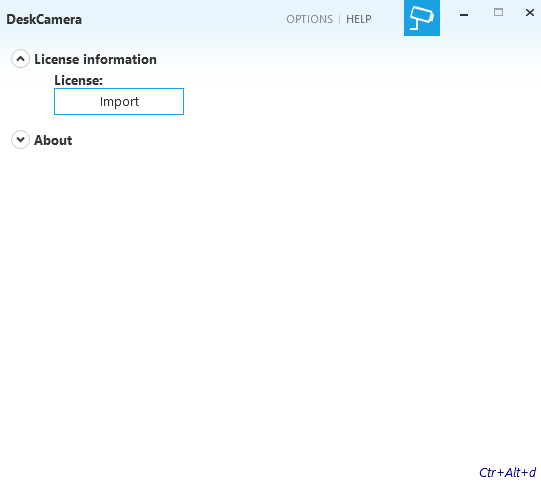
- Check your mailbox for the license file (.lic) and download it.
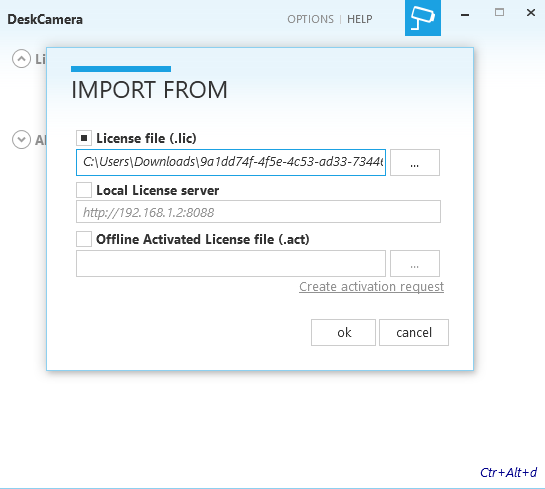
- Click Import, then browse your license file (.lic):
- Click "ok". You will be informed about the completed license import.
Click "ok" once more. - On the License information tab, you will see your license status, the trial period, and the activation button:
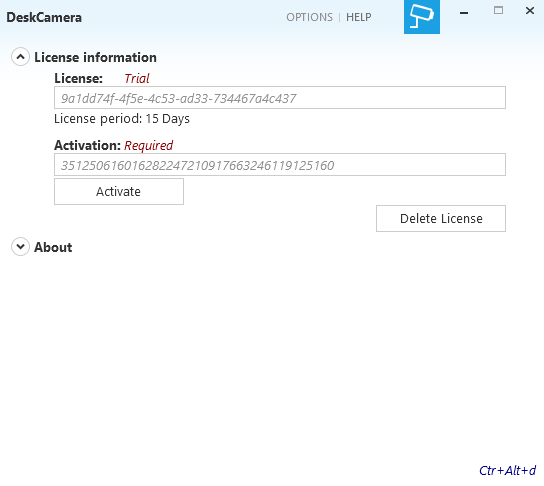
- Click Activate to apply your license.
You will be informed that the license will be tied to the PC you are currently using. - Click "yes", and DeskCamera informs you about successful activation.
- DeskCamera will launch automatically.
4.0 Manage Settings
- The Camera Settings tab will be open by default.
- Also, DeskCamera automatically starts capturing every available video source (display).
Captured video sources are listed at "Started Cameras":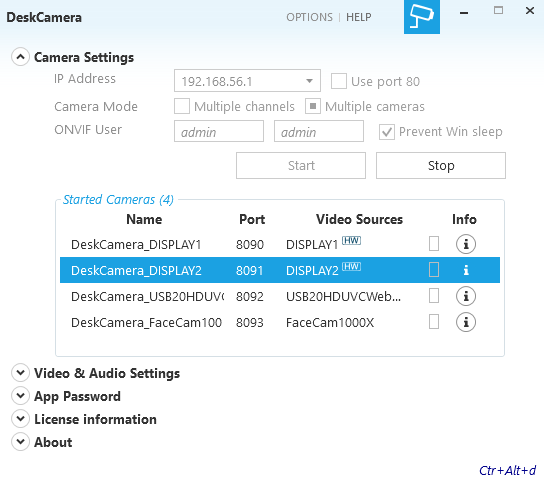
- Stop screen capturing to have access to settings.
- At Camera mode, select the "Multiple cameras" checkbox:

Enter the ONVIF User details:
- "admin" in the first field
- your CAE LearningSpace system password in the second field
CAE LearningSpace system password can be found on the Security tab of the System module.

Open the Video & Audio Settings
Important
Make sure that you apply the proper Video & Audio Settings and test them before moving on from this step. Changing these settings while your DeskCamera display is configured in CAE LearningSpace will cause problems in video delivery.
- Uncheck the Enable checkbox for every display that you don't want to capture:
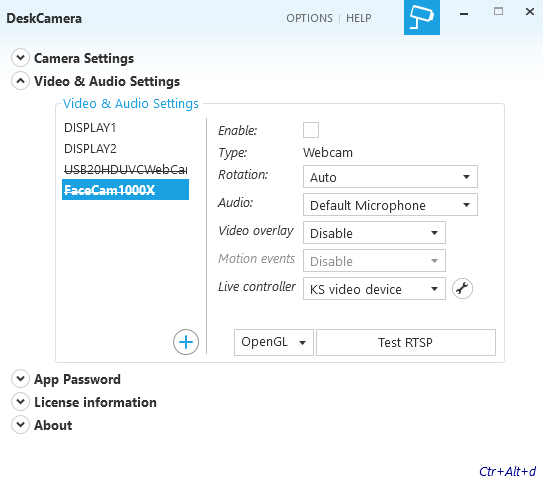
Choose the Audio recording device from the corresponding drop-down.
Note
Apply the Default Microphone option. DeskCamera will use the microphone that is set up as the default audio recorder in your system.
For Users Running Windows Opertaing System
Audio gain is automatically set by your operating system.
- Uncheck the Enable checkbox for every display that you don't want to capture:
- Go back to the Camera Settings.
- Click Start to begin streaming your desktop.
5.0 Connecting to CAE LearningSpace
5.1. Add DeskCamera to Your CAE LearningSpace System
As any device that can be connected to the system, CAE LearningSpace recognizes DeskCamera as if it was a physical camera.
- Log into CAE LearningSpace as an Admin or System Manager.
- Go to System.
- Go to the Cameras tab.
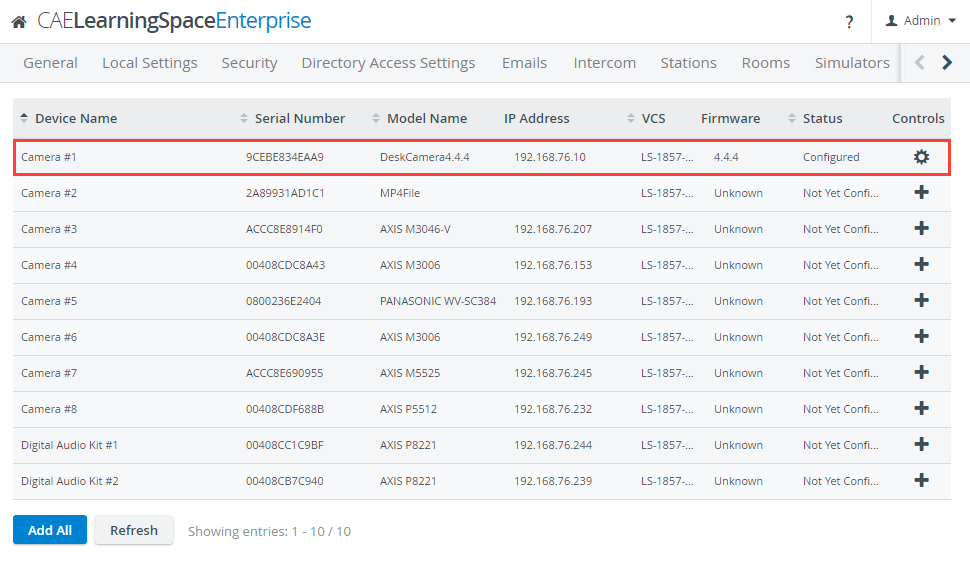
- Search for DeskCamera4.4.4 under Model Name.
Note: The Device Name column displays the serial number allocated to a camera. Cameras can be found and added to rooms by this serial number in the Rooms tab (see at 2). - Check the status of DeskCamera4.4.4:
The status of DeskCamera4.4.4 will be "Not Yet Configured".
In the Controls column, you can see a + icon: CAE LeaningSpace recognized the application as a camera, but DeskCamera4.4.4 hasn't been added to the system yet. - Click on the + icon to configure DeskCamera4.4.4.
If DeskCamera4.4.4 was added successfully, the status will change to "Configured", and a Cogwheel icon will replace the + icon:
Important
Avoid using Video & Audio Settings in your DeskCamera application while your display is configured in the Cameras tab in CAE LearningSpace.
Otherwise, you will face problems regarding video delivery in CAE LearningSpace.If you modified the video or audio settings while your DeskCamera displays were configured in the Cameras tab, you need to remove and add the display manually:
After adjusting Video & Audio Settings in your application, make sure screen capture is switched back on.
- Go to the Cameras tab in CAE LearningSpace.
- Open the DeskCamera display with its cogwheel (status: "Configured").
- Click on Remove in the Camera Settings tab.
- The status of the display will change to "Not Yet Configured".
- Find the display in the list and click on the + icon to reconfigure the display.
- Your screen capture will be added to CAE LearningSpace, its status will change to "Configured", and a Cogwheel icon will replace the + icon.
- Click the Cogwheel for further camera settings.
- In the Camera Settings tab, make sure that the display resolution of the camera is not larger than the recommended 720p.
Make sure to select 1280x720 or lower in the Video size drop-down: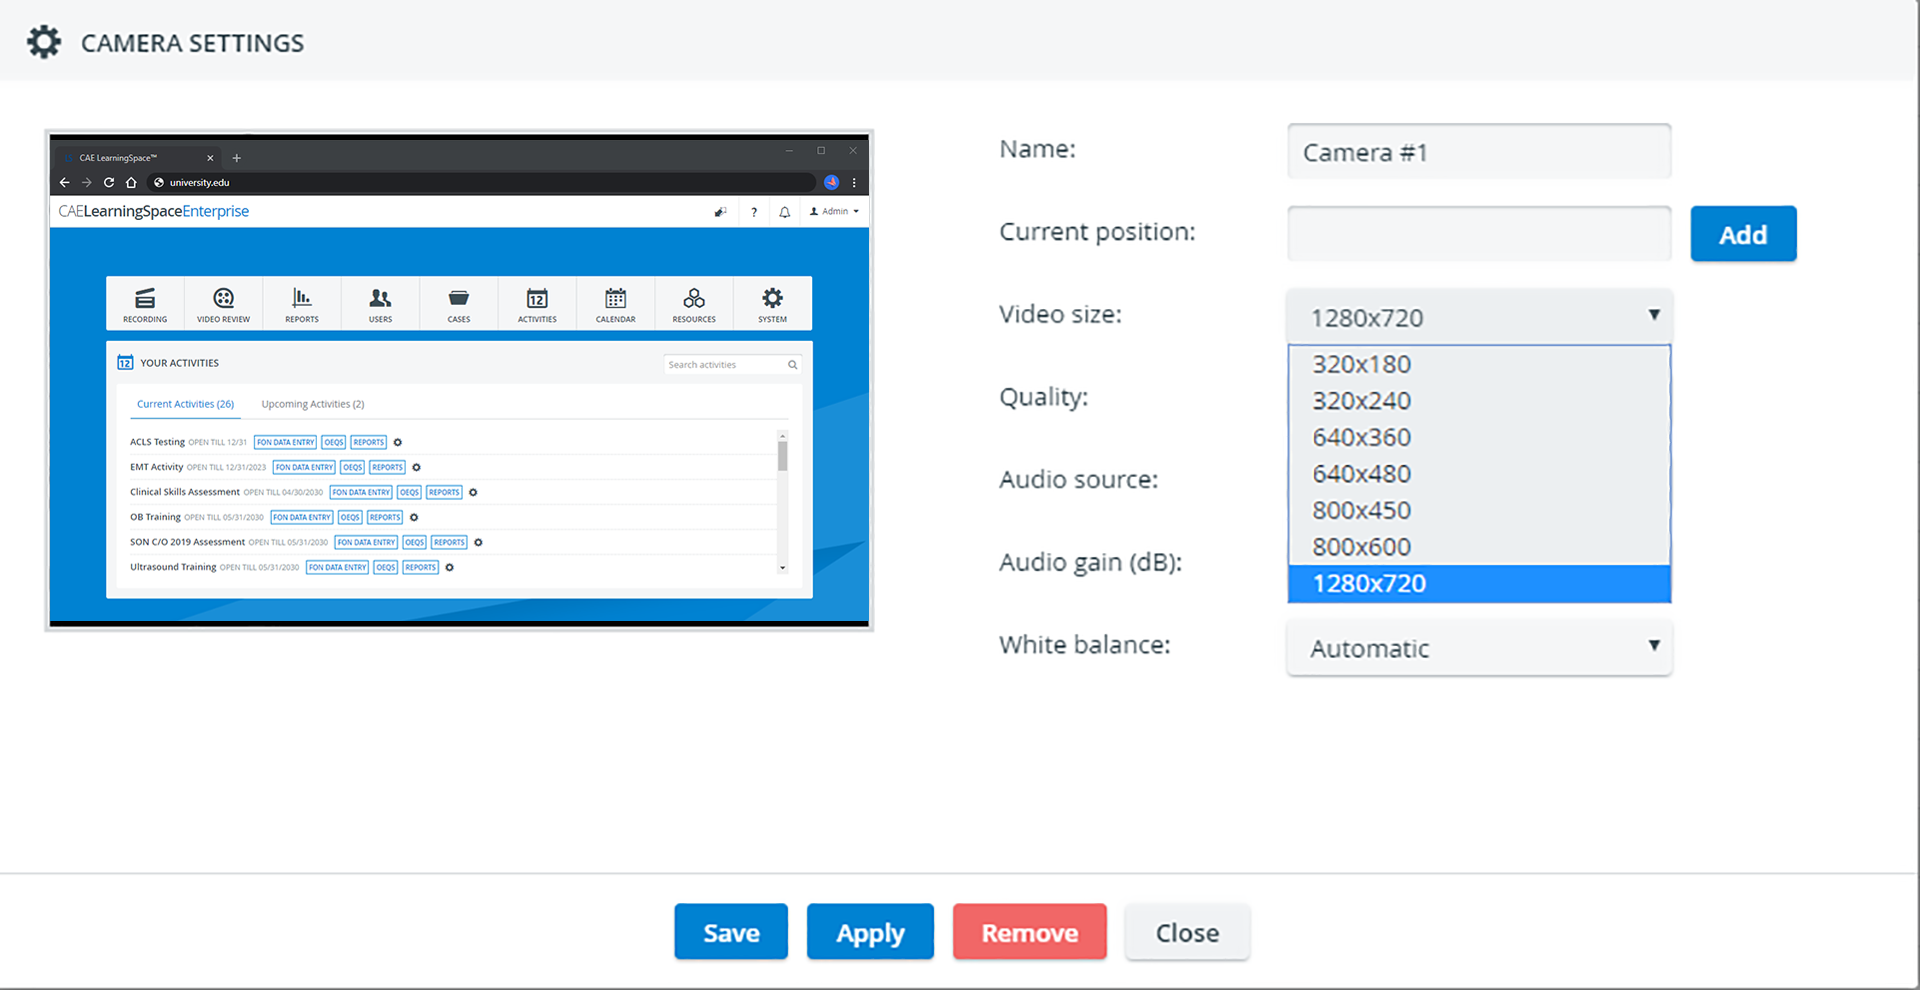
Click Save. From here on, the DeskCamera application is ready to be added to any of your rooms as a camera.
Important
With the DeskCamera screen capture solution, Privacy Mode is not available for SPs.
5.2 Add DeskCamera to a Room
- Switch to the Rooms tab:
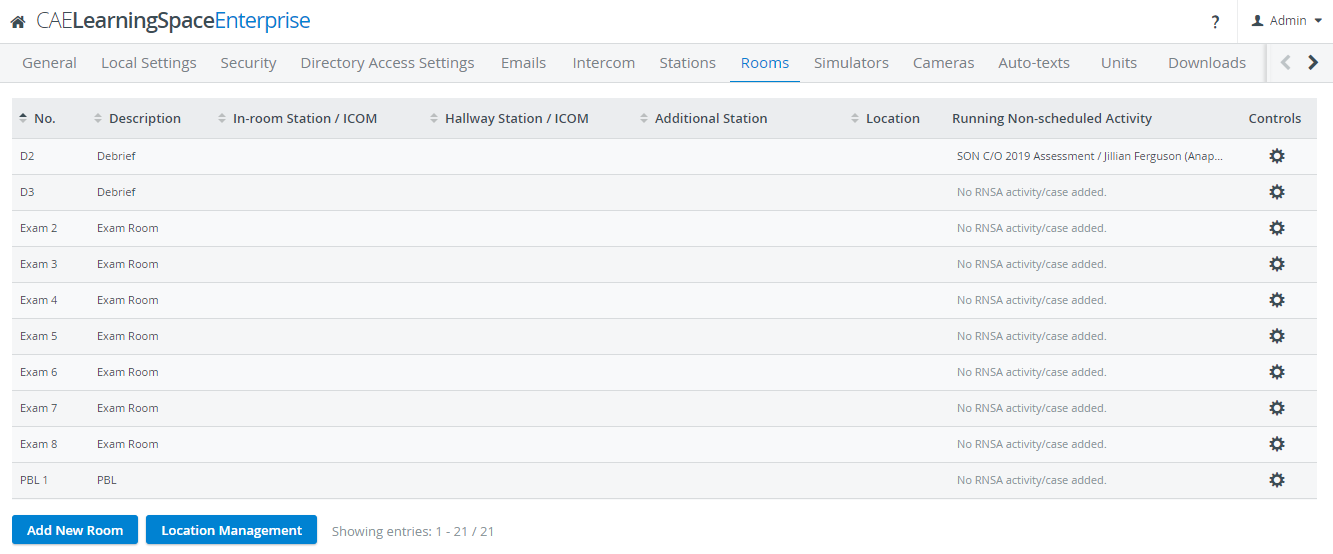
- Select an existing room that is currently not used by anyone.
Open a room for editing by clicking the cogwheel of the selected room in the Controls: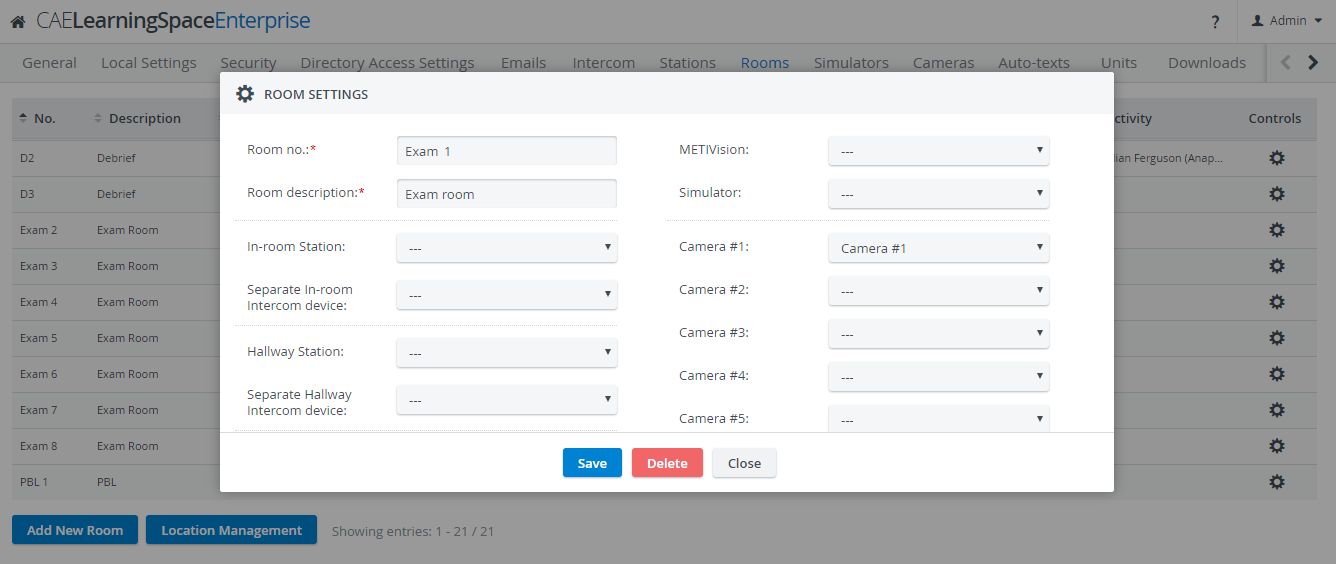
- Or create a new room.
- Select an existing room that is currently not used by anyone.
- To create a new room, click on the Add Room button in the bottom-left corner in Rooms.
- The Room Settings popup will open.
Name your room and provide a description.
Both fields are required to continue.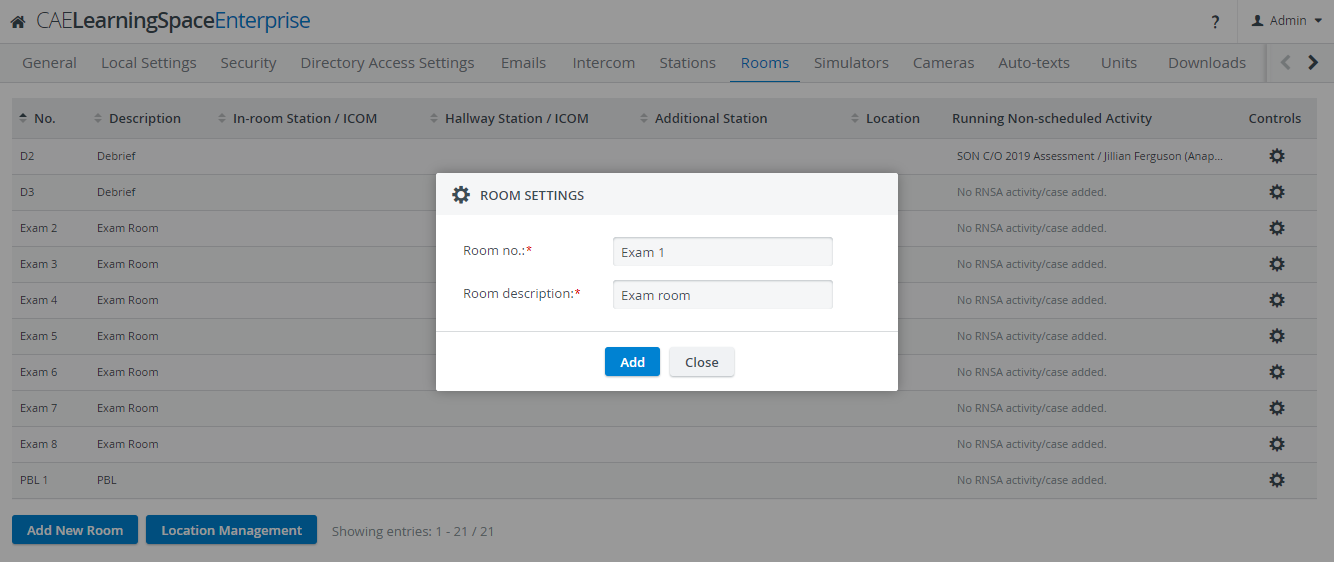
- After entering the details, click Add.
The popup will expand, displaying further settings. - Select the serial number of your DeskCamera (found in the Device Name column in the Cameras tab) in the first camera drop-down on the right.
- Click Save.
Your new room with the DeskCamera screen capture application is added to CAE LearningSpace. - Go to the Recording module to start recording in the room.
6.0 Important Notes Regarding the Use of DeskCamera
If you find DeskCamera suitable for your needs and you decide to purchase the license of the software:
Please note that the license will be bound to the specific hardware on which you activate DeskCamera.
You can still request new Trial licenses for every additional PC.
- DeskCamera will continue screen capture until you stop it in the application.
Click Stop on the Camera Settings tab to stop the application from streaming your desktop:
Before stopping screen capture:
After stopping screen capture: - When you stop screen capture on the Camera Settings tab in the application, displays (DeskCamera4.4.4) will be removed shortly from the Cameras tab in CAE LearningSpace.
Once you start screen capture again in the DeskCamera application, the displays will return with "Configured" status in the Cameras tab in CAE LearningSpace.
Overview
Content Tools