Important Note for Enterprise Lite Users
This feature is to be used with in-campus audiovisual (AV) inputs. Hence, it is not available for LearningSpace Enterprise Lite, as the solution is used for web-conferencing-based virtual simulation encounters only. To unlock this feature, please upgrade to the LearningSpace Enterprise solution.
The Annotations panel is not available in Center Overview (CO).
You can annotate recordings that are in progress using the Annotations panel.
The panel is a useful tool to add timestamped remarks to a recording that will later on come in handy at reviewing and debriefing.
The features of the Annotations panel are only available while a recording is in progress.
1. Basic Annotation Features
Adding annotations
- Open the panel by clicking the Annotations tab on the left side of the screen or using Panel visibility controls.
Make sure the recording in the room is in progress. - Enter your remark in the field on the top.
If you need to add a longer remark, click on the icon to expand the field.
 - Click on the blue speech bubble.
The annotation is added with a timestamp and the name of the learner(s) who are featured on the recording.
Tip
You can categorize your remarks with pictograms.
Before you add your remark, open Preset annotations with the blue triangular arrow and select a pictogram.
Save Your Annotations Along the Way
For FON Data Entry Users and Admins
If you have FON Data Entry or Admin privilege, you can save the annotation while adding it to the recording:
- Click on the blue speech bubble with the plus sign.
![]() Does the blue speech bubble with the plus sign remain inactive? Open the Annotation Settings window with the cogwheel and uncheck the Use Case-related annotations box then return to the panel. Find more information about the Annotation Settings window below.
Does the blue speech bubble with the plus sign remain inactive? Open the Annotation Settings window with the cogwheel and uncheck the Use Case-related annotations box then return to the panel. Find more information about the Annotation Settings window below.
The annotation is added to the recording and saved at the same time.
Filtering
You can use the text field to search for annotations:
a. Find by keyword: every preset annotation will be listed which contains the keyword.
b. Filter by category: click on a pictogram and every annotation will be listed in that category.
Tip
Click on a highlighted pictogram to deselect it and make all categories visible.
The complete list of preset annotations is only visible when all pictograms are grayed out.
The complete list of preset annotations is only visible when all pictograms are grayed out.
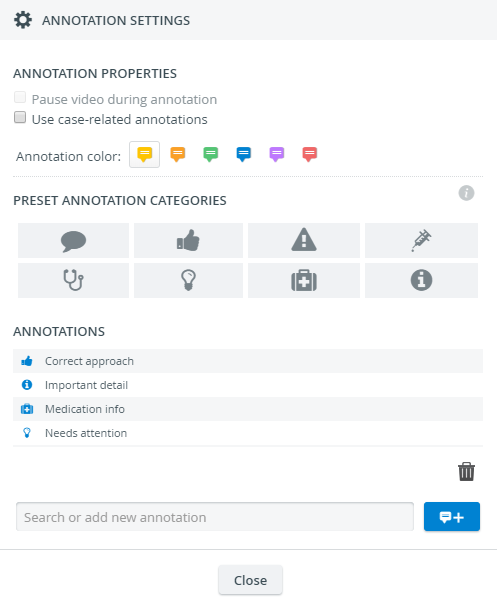
2. Advanced Annotation Settings
Click on the cogwheel on the Annotations panel in the upper right corner to access Annotations Settings for further options:
All preset annotations created in the system are listed under ANNOTATIONS.
Case-related Annotations
Select Use Case-related annotations to list solely the preset annotations created for/associated with the Case running in the room.
The checkbox is only active if a Case is assigned to the room.
Preset annotations for each Case can be managed in Cases in the Preset annotations tab.
Pause video during annotation is disabled in Recording.
Annotation Color Settings
You can personalize your annotations by picking a color to set them apart from the annotations of other users. The color setting only applies to the annotations you add to a recording through your profile. ![]() You cannot define a color for an individual preset annotation or category—find out more about it here.
You cannot define a color for an individual preset annotation or category—find out more about it here.
You may even change the color of your annotations during the same recording e.g. to mark correct or incorrect techniques, positive or negative feedback, etc.
The system saves the most recent color setting in your profile so when you return the color of your annotations will be the same as you last set it.
Tip
Choosing different colors can help distinguish faculty members from each other.
Filter
Enter keywords or use the pictograms to filter annotations.
The pictograms are open to interpretation; the system does not define the meaning of any of them.
Create New
For FON Data Entry Users and Admins
If you have FON Data Entry or Admin privilege, you can create and save new annotations in the Annotation Settings window.
- Select a category you prefer (optional).
- Type in the annotation at the bottom of the window
- Click on the blue speech bubble with the plus sign.
Your new annotation is saved.
Preset Annotations in System for System Managers and Admins
Saved annotations are also accessible to users with System Manager privilege and Admins in the General tab in System Manager. By clicking Annotation Settings, you can manage the category of existing preset annotations, add new ones, or delete.
For FON Data Entry Users and Admins
If the Use Case-related annotations checkbox is ticked while you are saving the new annotation, the annotation will be saved to the Case set up in the room. The annotation will appear on the Preset annotations tab of the Case.
The default category of a new annotation—if neither of the pictograms was selected—is the thought bubble: 
Change Category
Drag-and-drop an annotation to change its category:
Delete
For FON Data Entry Users and Admins
If you have FON Data Entry or Admin privilege, you can delete an annotation with drag-and-dropping it into the trash can.

For more information, visit our Recording Module and Recording Module Training Video pages.
Overview
Content Tools