Released in the summer of 2022, the new Single Room View (SRV) of CAE LearningSpace Enterprise, called LearningSpace NextGen Room View has a much cleaner, a more easy-to-use user interface on both the Recording and Video Review pages, and by so, increasing efficiency and enhancing user experience.
SRV layout re-organized
The user interface of the Single Room View got re-organized for more efficiency in the following way:
Re-organized basic layout
- Video player on the left-hand side
- Annotations and Data Entry tab on the right side
- Simulator Control and Layout tab available
- Recording setup (earlier Record control) available at the top
- Intercom and Video control section at the bottom
- Send to Screen option and Simulator Panel at the bottom
- Bottom- and side panel can be minimized with the toggle panel width/height option

In the new Recording setup pop-up Activity, Case and Participants can be selected for the recording:

Under 'Recording on', the selected cameras for recording are room specific - not user-specific.
Recording setup can be loaded from a saved state:

Recording can be started
- without Case selection
- by loading setup from RNSA
- by loading setup from Advanced Scheduling


Layout tab
The Layout tab can be found on the right-hand side of the Single Room View and contains the Layout settings and the Media section panels.
Layout settings section
In the LearningSpace NextGen Room View layout, users can choose from the following views to get the most convenient and suitable layout for their aims:
- Double view: 2x1 feeds are displayed
- Quad view: 2x2 feeds are displayed
- Pinned view: 1+5 feeds are displayed, one feed is highlighted
- 3x3 view: A maximum of nine feeds are displayed
- Single view: One selected feed is displayed. Picture-in-Picture view can be enabled by the toggle:

The recommended video size (aspect ratio) is 16:9 (e.g. 1280x720).
The sizing of camera streams might not be optimal with a 4:3 video size (an additional black bar/stripe might be visible at the upper and lower edges of the screen).

See also How to Manage Cameras.
Important
While the Layout tab is active, the on-screen Camera controls are disabled.

Before saving personalized layouts, all media sources are displayed in the optimal layout for new rooms by default.
IMPORTANT Note
A layout is saved as part of the User’s settings and it is not saved as part of the Room’s setup. This means that, while there is no option to have someone set up a custom layout for a given room to be shared with everyone, each user will see their own custom setup and they will not overwrite each other.
After upgrading to the LearningSpace NextGen Room View, already existing Room layouts in the earlier version of SRV are lost/reset.
Full-screen mode
Slider component at the bottom is available in full-screen mode.
The whole camera layout can be set to full-screen mode, not just a single media stream.
Media section
Camera feeds and simulator-related media (CTG, waveform and trendchart/patient monitor) added to a room are available in the Media section. Media can be moved to and removed from the video layout - pinned or unpinned - by using the drag-and-drop or the pin-to-layout functionalities. This way, only the selected media sources will be presented to the viewers.
CTG, waveform and trendchart/patient monitor are displayed in separate windows.
Media sources (camera feeds, physio apps) can be moved into the video layout or into the Media section as desired, using the new drag-and-drop functionality of the SRV.

Pin-to-Layout
Media sources can be "pinned" (moved) to the layout also by clicking on the ![]() icon in the respective feed.
icon in the respective feed.

Media can be "unpinned" - removed from the video layout and moved to the Media section - by clicking the ![]() in the right upper corner of the camera/media pane.
in the right upper corner of the camera/media pane.
IMPORTANT Note
By default, recording applies to all media - whether added to the video player section or not. This can be overwritten in the Recording setup section.
Picture-in-Picture
One desired camera feed or media source can be displayed in a focused way, while the rest of the media sources (a maximum of four) can be displayed in the corners of the video layout.
Media sources (camera feeds, physio apps) can be moved into the layout or into the Media section as desired, using drag-and-drop or pin-to-layout.
The Picture-in-Picture toggle is only available in the single Layout view.

Annotation section
Within the Annotations section, LearningSpace users can
pre-select the color of a free-text annotation
- pre-select the color of a preset annotation
- choose a category for an annotation/preset in an easier way
- see the "All" phrase on the card, if an annotation is added to “All learners” (the name of all learners will not be displayed separately on the annotation card).

In case users with an option to annotate during Recording enter the SRV prior to Admins (or any users with appropriate privileges) who start the recording, the Learners selected for annotation (and data entry) by the Admins afterwards will not get updated on the annotating users' Recording page. Still, the annotations will only apply to the selected Learners.
The timestamp of an annotation will represent the time of the first character typed into the annotation's input field.
Color name of annotations
To comfort users with color-detection challenges, the name of the color of an annotation is displayed when hovering over
- the annotation on the timeline,
- on the color selector in the Annotations tab,
- or on the annotation's color-marker, in the Annotations tab.


The color of an annotation can be changed by clicking on the color-marker on the right-hand-side.
Data Entry tab
The Data Entry tab is for filling out the FON checklist of the Case (if any) during live recording.
Data Entry is available for scheduled events or when recording on the fly, in case Activity, Case and Learner group is associated with the room.
Data entry can be submitted for a single learner or for the whole group assigned to the event. Selected learners are displayed in blue. Group grading can be enabled by using the respective toggle.
If different responses were given to individual learners and Group grading is activated afterwards, a warning message appears about the Various responses and allows the grader to set the answers the same:

FON data entry users should pay attention during Data entry to submit for the correct Learners - in case they enter Recording prior to the Admins (or any users with appropriate privileges) who start the recording.
In this case, the Learners selected for data entry (and annotation) by the Admins are not updated on the Faculty users' Recording page.
The limit of Group grading is 100 learners. If more learners are selected, the system warns you: 
Simulator Control tab
When a simulator is connected and assigned to a room of CAE LearningSpace, the SRV of the Recording module has the Simulator Control tab displayed. Simulation data can be monitored and controlled from here such as: SCE/Case, Current State, Next State (by selecting it from the respective drop-down and clicking ![]() ). Also, the simulation scenario can be started/played
). Also, the simulation scenario can be started/played ![]() , paused
, paused ![]() and stopped
and stopped ![]() on this tab as well.
on this tab as well.
Installing and connecting a simulator can be done within the System module.

CAE Healthcare simulators associated with a room display their respective Waveform and Simulator Log in the Single Room View and get recorded along with the camera feed when REC ![]() is started.
is started.
The Waveform and Simulator Log display figures in synchrony with the video feed.

Physio apps (Waveform, Trendchart, CTG) are not recorded if the simulation is started during a running recording.
Thus, if we wish to record physio/sim data, the simulation must be started before the recording start.

In case the Record automatically upon simulator connection option is activated on the Rooms Tab, recording will immediately start once simulation is started on the Simulator.
Simulator panel
The Simulator panel (widget) can be found in the Recording panel. When a simulator is connected and assigned to a room, the SRV of the Recording module will have the Simulator panel displayed in the bottom panel.
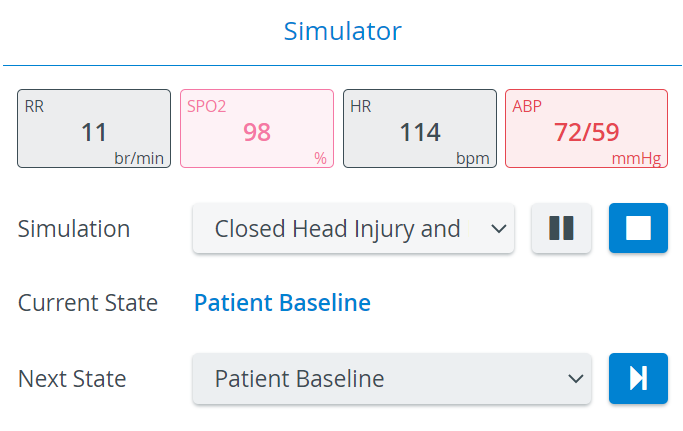

The Simulator panel provides information about
- the main physiological data,
- the simulation scenario running on the manikin: including the Simulation (SCE) Title, the actual ('Current') and the upcoming ('Next') States.
The Simulation scenario can be
- played

- paused

- stopped

- changed (by selecting another scenario from the drop-down).
- played
The Next State drop-down menu allows for moving onto a selected State. ![]()
Simulator Control and Simulator panel is not available for non-CAE (third-party) simulators.
Intercom via Simulator
In LearningSpace NextGen Room View, Intercom can be used via Simulators as well, within CAE LearningSpace Enterprise: announcements can be sent to the simulator's head ("Voice of Patient"),
by selecting the Simulator button ![]() turning it into blue
turning it into blue ![]() and pushing the Push-to-Talk button in the Intercom area.
and pushing the Push-to-Talk button in the Intercom area.

If there is no valid Intercom destination available in the system, the Push-to-talk button is displayed in orange color (when pushing it) and a warning message shows at the top of the page:


If Intercom setup is not completed (e.g a destination station needs to be reconnected), the Push-to-talk button is displayed in red color (when pushing it) and a warning message shows at the top of the page:

See How to Set Up Conditions for Intercom.
The same announcement cannot be sent to the Room and to the Hallway simultaneously.
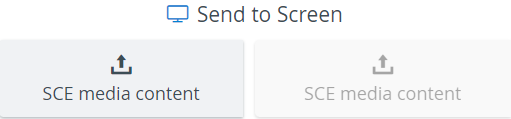
Send to Screen option
With the help of a decoder, given media can be sent to a display in the room. Although this section is always visible, it is only useful when using Maestro simulators in the room.
See Maestro User Guides here.
Picture files can be sent to different display monitors by clicking the corresponding button. There are two kinds of output for the Send to Screen function:
- display monitor
- TouchPro patient monitor of the JUNO simulator or other CAE simulators.

The Send to Screen option requires the following technical setup to be completed:
- a monitor/decoder and/or CAE simulator connected and assigned to the room (within the System Manager)
- content uploaded (via Maestro)
Content can only be uploaded via Maestro: if a CAE simulator is connected to the system, content uploaded via Maestro will be available for sending.
The Send to Screen function is only available for CAE Simulators, not for non-CAE (third-party) simulators.
PTZ functionalities
Within LearningSpace NextGen Room View the following ways of pan-tilt-zoom (PTZ) functionalities are available to improve camera movements:
On-Screen PTZ: Click in the center of the video
 and pull the camera into the desired direction. The movement of the camera will stop by releasing the mouse.
On-Screen PTZ is focused on the middle of the screen, thus it cannot be used in the footer and header of the SRV camera feeds.
- Scroll-To-Zoom: zoom-in and zoom-out by scrolling on the mouse.
- Pan-Tilt-Move: camera moves into a direction after clicking into the desired area of the camera feed.
- Area Zoom: camera zooms into the area drawn by the user.

Move and reset buttons: camera movement can be controlled by the arrows and the magnifying glass icons in the right lower corner of the camera feed. Zoom level can be reset to the default value with the Reset zoom icon.


PTZ presets already existing in the old version of SRV will stay intact in LearningSpace NextGen Room View.

Playback
During live recordings the following enhancements can make video review easier:
- Live stream can be paused with the pause button, and recording can be played back by dragging the slider to the desired point on the video slider.
Both current and live timestamps are displayed next to each other in the video record panel.
Live view can be switched back to by pushing the Go Live button.

Video can be paused and the slider can be dragged after 30 seconds have passed from the start of recording. Before that time the pause button is greyed out and the slider cannot be moved.

Toggle Panel Width and Height
With this functionality, the bottom- and side panels can be minimized in order to maximize the displayed camera- or media view.
The toggle reveals itself by hovering over the bottom- or side panel, or on the panel border lines. When activated (i.e. camera view is maximized), the toggle arrows are displayed constantly.

For more information, visit our Recording - How to pages and watch the Recording Module Training Video.
Overview
Content Tools