The Check-In process of the Inventory module includes registering new consumables, non-consumables or assets, or returning non-consumables or assets to the selected storage location.
This page walks you through the different kinds of Check-in workflows for each item category.
- To Check in an item, click on the Check-In button located in the upper right corner of the Transaction list.

On the Check-in page, as the first step of any transaction workflow, you need to detect your item. Use your barcode scanner or start typing the name of your item.

Users in charge of transactions first need to detect an item, then subsequently select a location, place the item in their Cart, and are only required to select an assignee in the last step.
Note
You can only look up items that have been registered in the Catalog before. Learn more on How to Detect Items in Your Inventory.
You will land on the Home Locations tab in the case of every item category. You can always switch to the All Locations tab where you will find the comprehensive list of locations at your site. The Home Locations tab contains the location history of the past 180 days of the inventory items. The tab shows where the item was checked out from and where it is currently in stock too, help you select a check-in location more easily.
Tip
Use the quick-search bar to filter locations.

The most recent check-out location of the item will always be marked by an '
 ' icon.
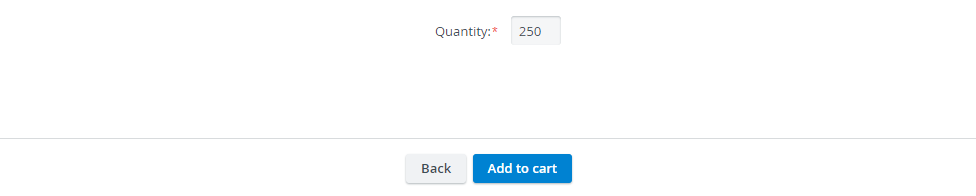
- Define the quantity of your item and once you are finished, click Add to cart.
- You will be directed to the Transaction summary page where you can check in new items for the same location with the New Item button, or you can complete the check-in by using the Finish transaction option.
Scanning Functionality
The Inventory module is designed to handle barcode and QR-code reading to facilitate transaction assignee registration and item detection during transactions.
Continue to this section to learn more about the recommended barcode scanning solutions for CAE LearningSpace Inventory.
Continue with the following steps after detecting your item:
Consumables with Expiration Check-In
While following the basic transaction processes, Consumables With Expiration![]() items can be checked in or checked out by identifying their batches.
items can be checked in or checked out by identifying their batches.
Select the location where you want to check in the item.
The most recent check-out location is marked by an '
' icon. 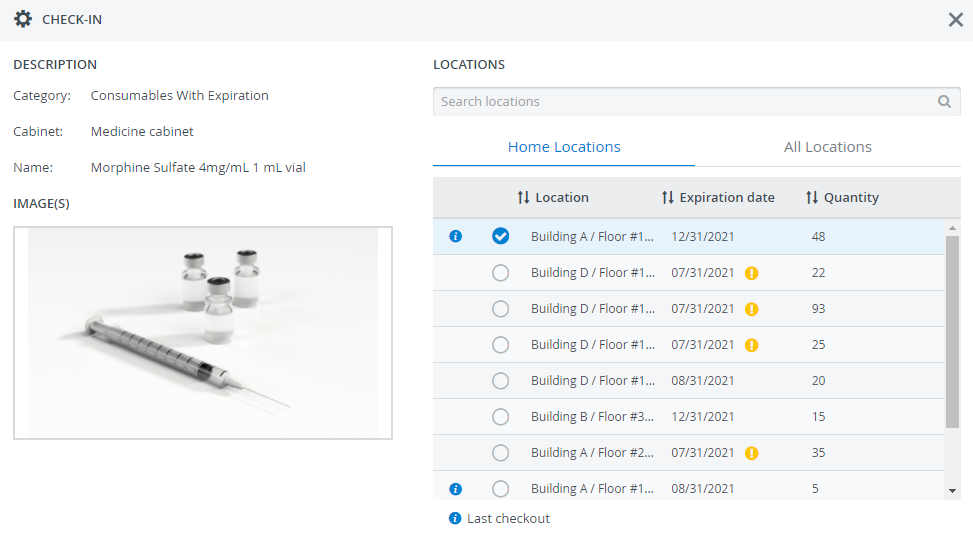
Enter the item's expiration date using the field's date picker.
When selecting a Home Location, the expiration date of a previous batch at the location will automatically load in the Expiration Date field. You can modify the date afterwards at all times.
When defining a date, click on the day in the calendar as the last step to save your changes in the field.

Use your barcode scanner to scan the system generated QR-code placed on your Consumables With Expiration to detect your item inside your inventory and autofill the expiration date of your item.
- Enter the item quantity.
Continue with Add to Cart to create a new cart or add your items to an existing one.

The Back button returns you to the item detection step if there is no cart in progress yet. If you are adding the item to an existing cart, you will land on the Transaction Summary page.
Easy Item Check-In
The quantity of Consumables with Expiration can be increased without carrying out the Transaction workflow step-by-step. For instructions, refer to the Easy Item Check-In page.Learn more about How to Finalize Your Transaction in the Cart.
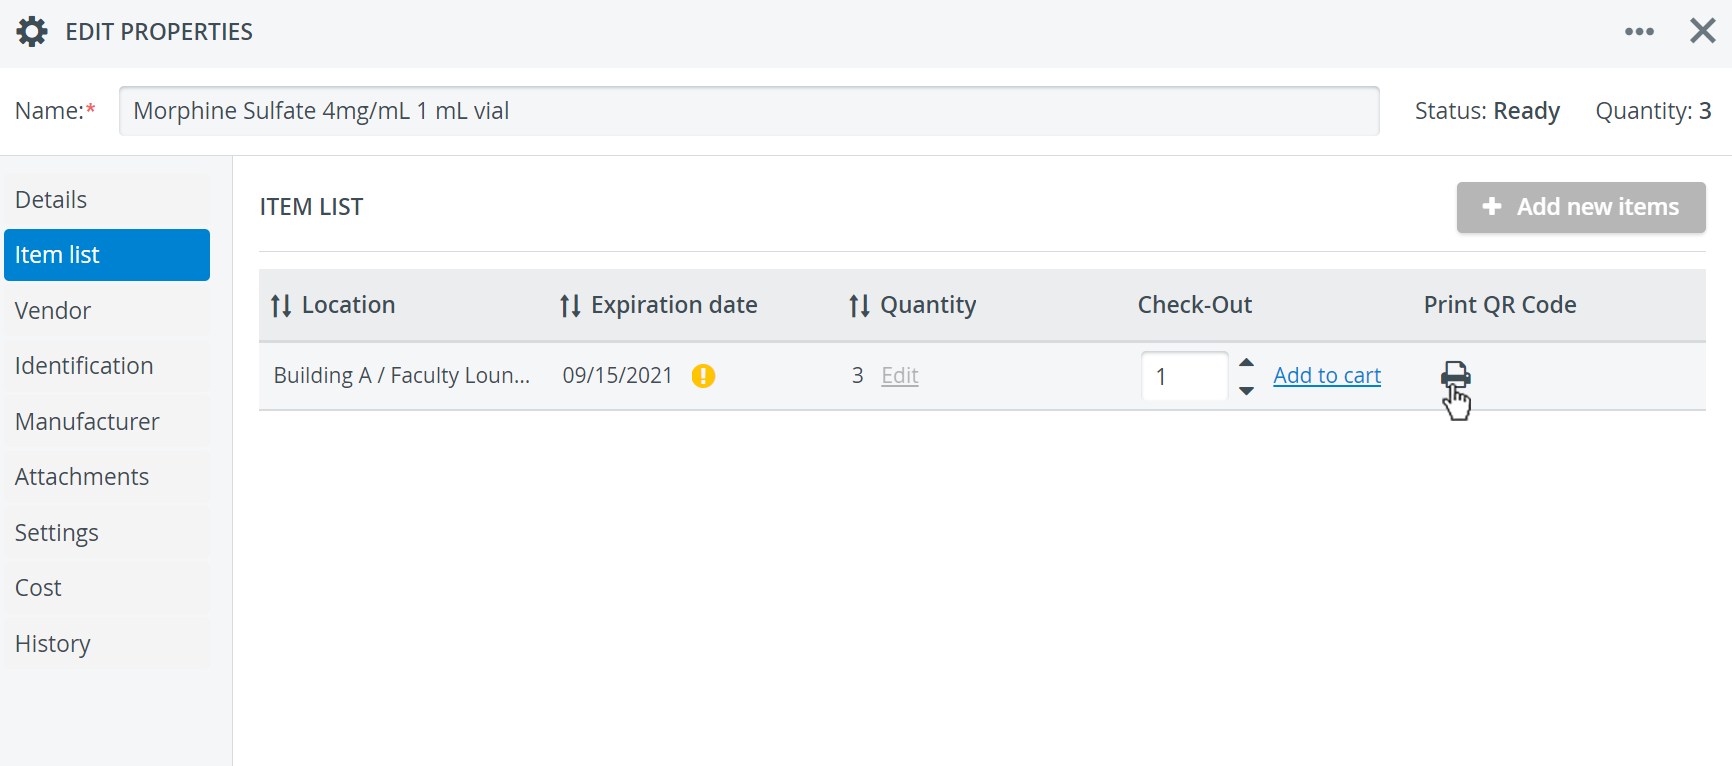
Access the QR-Codes of Consumables With Expiration
Once you have added a new batch of a Consumable With Expiration item in the Catalog tab, the system will assign it a unique QR-code. Then you can print and place that QR-code on your physical items and check them in or out:
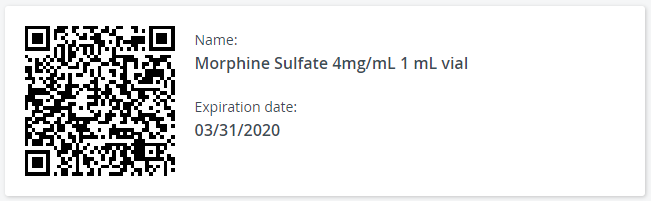
Look up batches in the Catalog tab by opening your Consumable With Expiration item for editing. Go to the Item list tab to view every available batch.
To display the QR-code of the batch, click on the printer icon in the Print QR Code column:
Important
Batches with the same expiration date are listed separately in the Item list according to location. At the same time, batches with the same expiration date checked into various locations have identical QR-codes regardless of location.
QR-codes do not store the location of the items.
Consumables without Expiration Check-In
Select the location where you want to check in the item.
The most recent check-out location is marked by an '
' icon. The location the item was most recently checked out from is marked with an '' icon.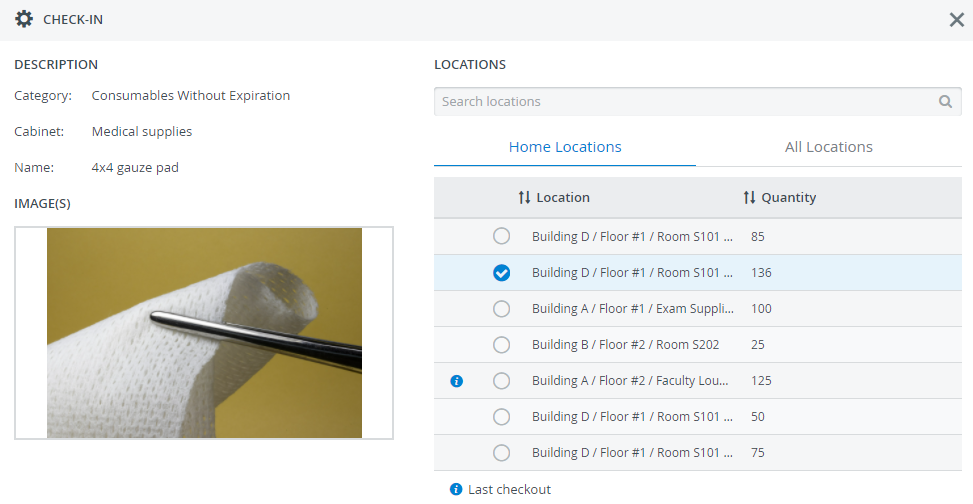
- Enter the item quantity.
Continue with Add to Cart to create a new cart or add your items to an existing one.
The Back button returns you to the item detection step if there is no cart in progress yet. If you are adding the item to an existing cart, you will land on the Transaction Summary page.
page.
Easy Item Check-InThe quantity of Consumables without Expiration can be increased without carrying out the Transaction workflow step-by-step, but check-in logs will still be created by the system to help trace back inventory movements.
For instructions, refer to the Easy Item Check-In page.Learn more about How to Finalize Your Transaction in the Cart.
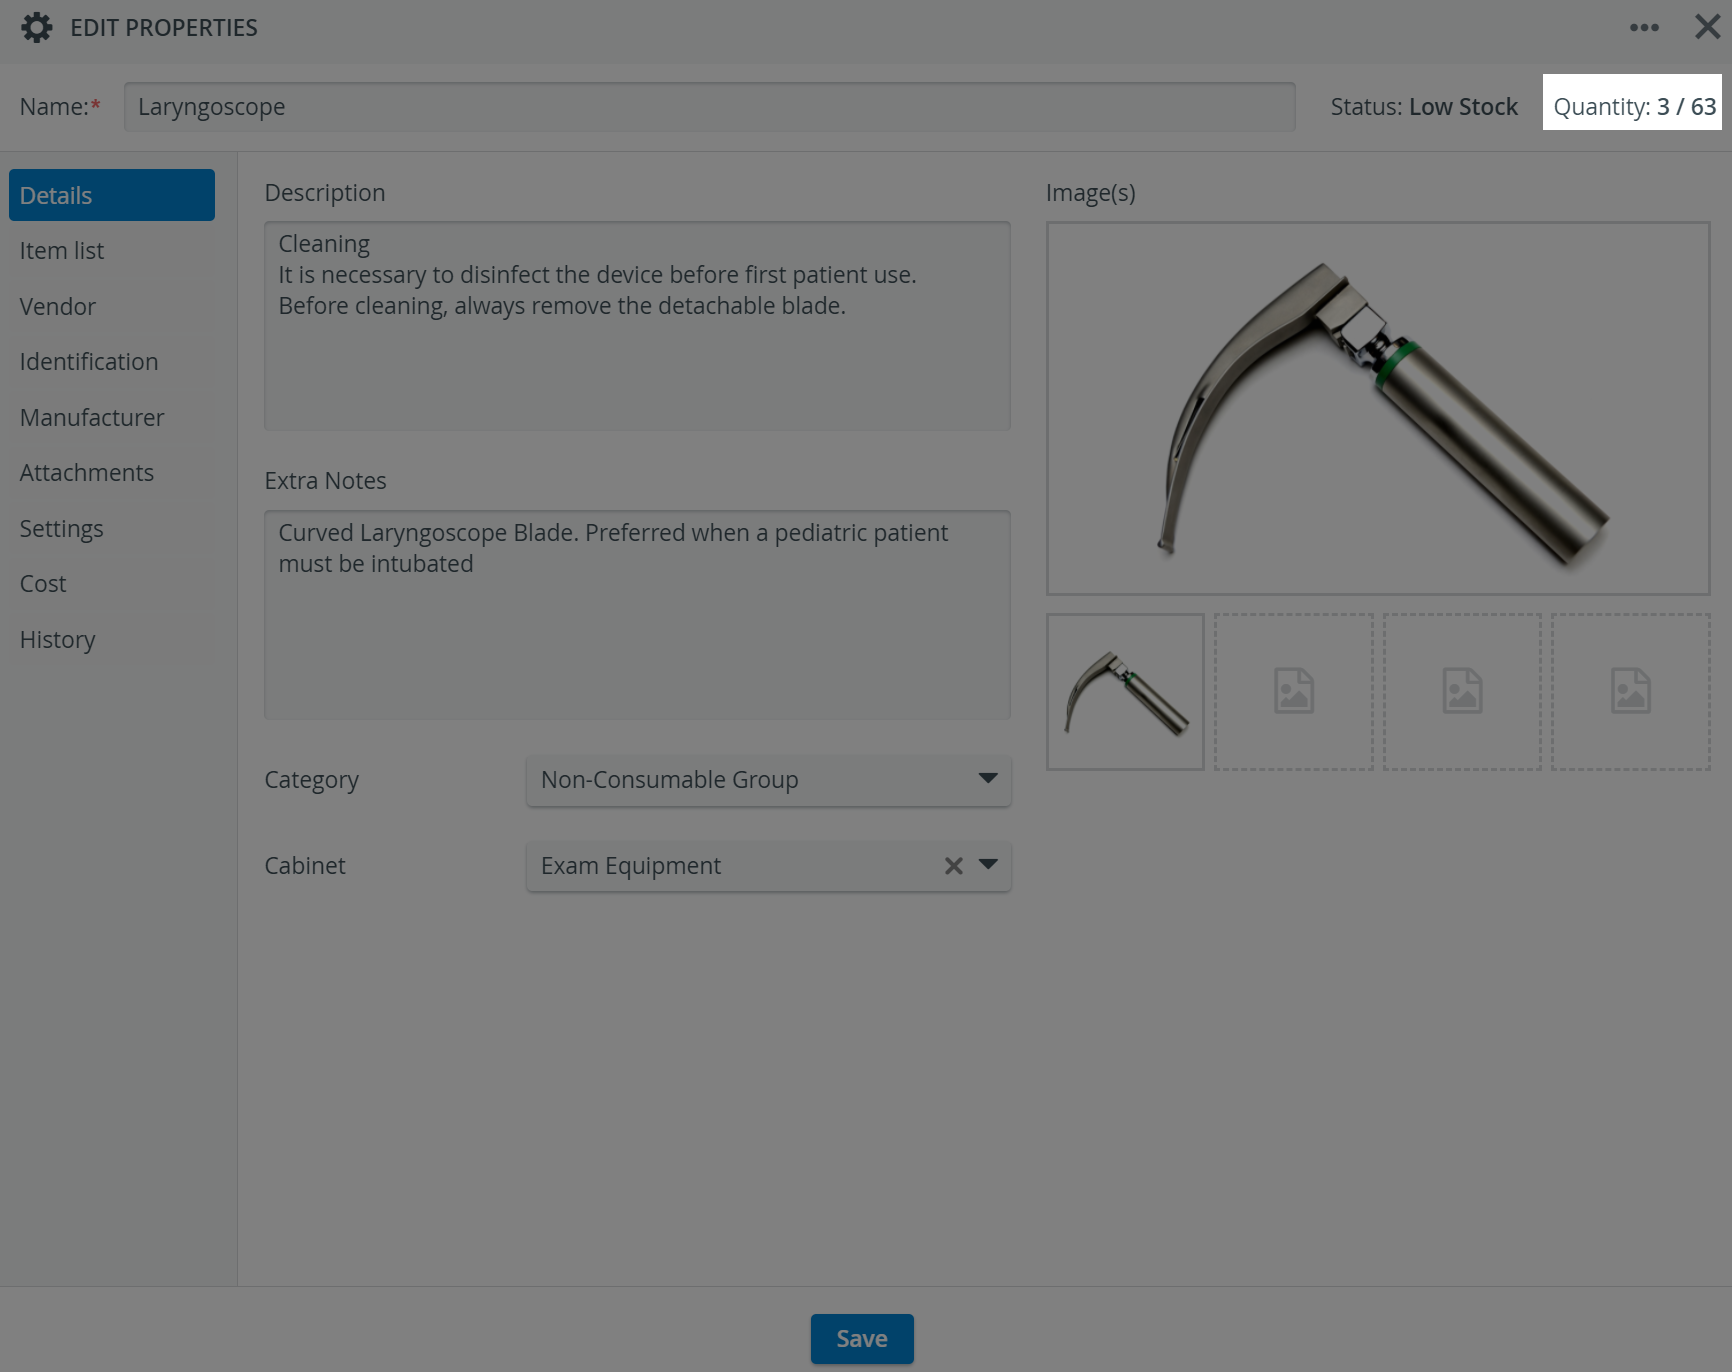
Non-Consumables Check-In
The Inventory module treats Non-Consumable (Durable) items as permanent equipment: in-use items are On Loan and need to be returned to stock after use ('Return from loan' option). You can also register additional quantities for an item with the New option at check-in.
The quantity of each non-consumable item is expressed in a ratio: the currently-in-stock amount of the item per the total amount of the item. Lost or broken items can be deleted from the total quantity by reconciliation.
Complete the basic check-in process up to defining the check-in quantity of your item. From here, there are two ways to check in Non-Consumable items:
New Item
Increase the total quantity of an item with the New option for checking in new additions to your stock.
Select the location where you want to check in the item.

Enter the item quantity.
The total and ready quantity both increase.
Select the reason for check-in. Here, the example shows New for reason:

The Return from loan option is inactive if there aren't any items on loan at the moment.
Continue with Add to Cart to create a new cart or add your items to an existing one.
Return from Loan
Return Non-Consumable items to stock from 'On Loan' after use.
Select the location where you want to check in the item.
The most recent check-out location is marked by an '
' icon. The location the item was most recently checked out from is marked with an '' icon.
Select Return from Loan as the reason for check-in.
Enter the item quantity.
Only the ready quantity increases by the number of checked-in items.

The quantity field warns you in case the quantity of returned items exceeds the number of items out on loan. The system does not allow for returning more items than currently out on loan:
Continue with Add to Cart to create a new cart or add your items to an existing one.
The Back button returns you to the item detection step if there is no cart in progress yet. If you are adding the item to an existing cart, you will land on the Transaction Summary page.
Easy Item Check-In
The quantity of Non-Consumables (Durables) can be increased without carrying out the Transaction workflow step-by-step. For instructions, refer to the Easy Item Check-In page.
Learn How to Finalize Your Transaction in the Cart here.
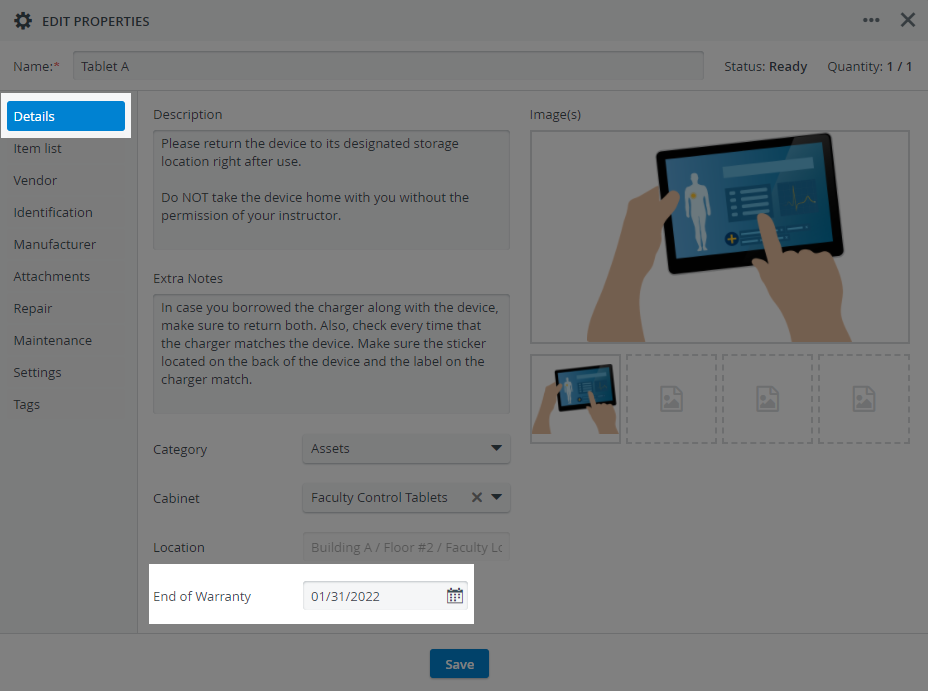
Asset Check-In
Register a New Asset
Assets ![]() can only be registered one by one in order to keep track of their whereabouts and follow their lifecycle with the most precision possible.
can only be registered one by one in order to keep track of their whereabouts and follow their lifecycle with the most precision possible.
Before checking in new assets, their quantity is 0/0. After you check in an asset, its quantity changes to 1/1, and its status is Ready.
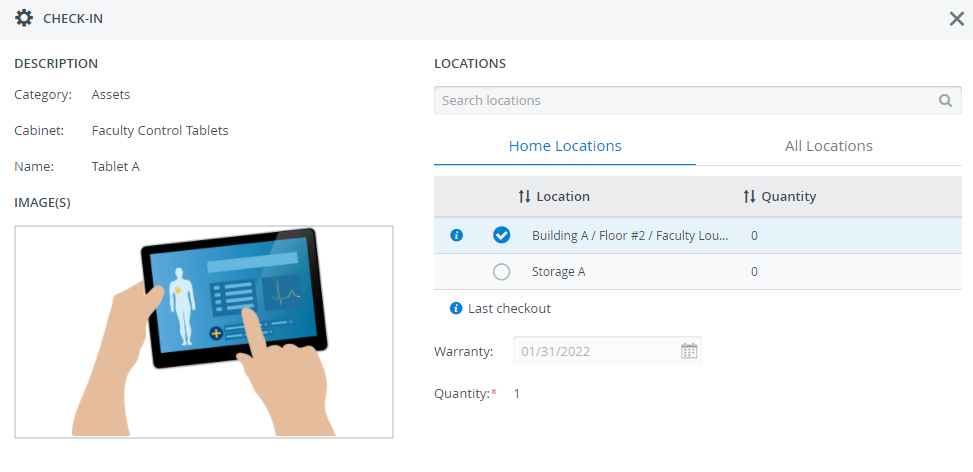
Select the location where you want to check in the asset.

While checking in an asset, you also need to include the Warranty of the item after you have detected it.Asset warranty can also be added at any time on the Details tab of the asset.
Continue with Add to Cart to create a new cart or add your items to an existing one.

The Back button returns you to the item detection step if there is no cart in progress yet. If you are adding the item to an existing cart, you will land on the Transaction Summary page.
Return an Asset
When you check out an available asset from Inventory, its quantity changes to 0/1, indicating that the asset is currently out, and its status changes to On Loan:
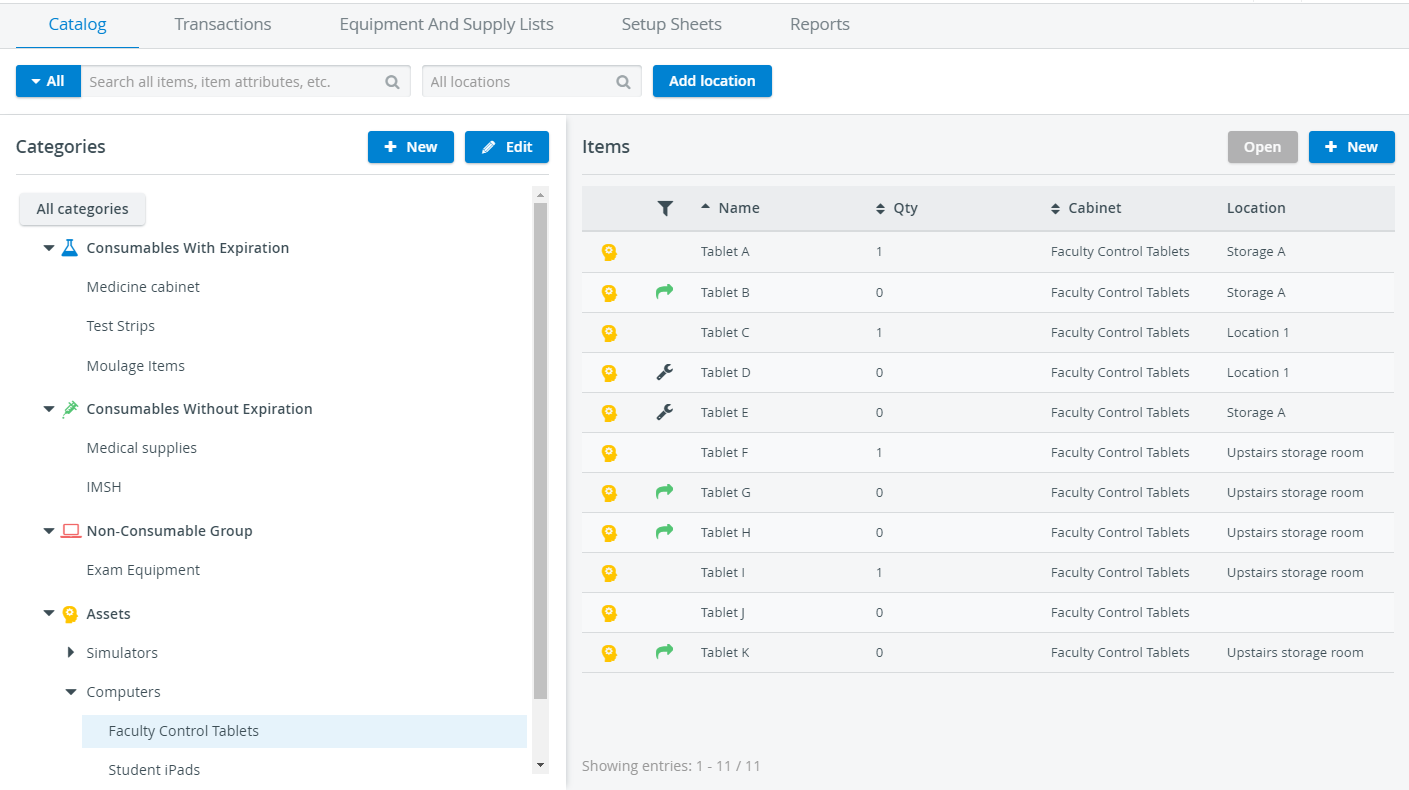
The On-Loan status is indicated by a green arrow ![]() in front of the asset in the Items list on Catalog.
in front of the asset in the Items list on Catalog.
- Select the location you want to return the item to.
In case you have selected an asset that is in stock already, or not available for some other reason, the system will inform you about the asset's exact status: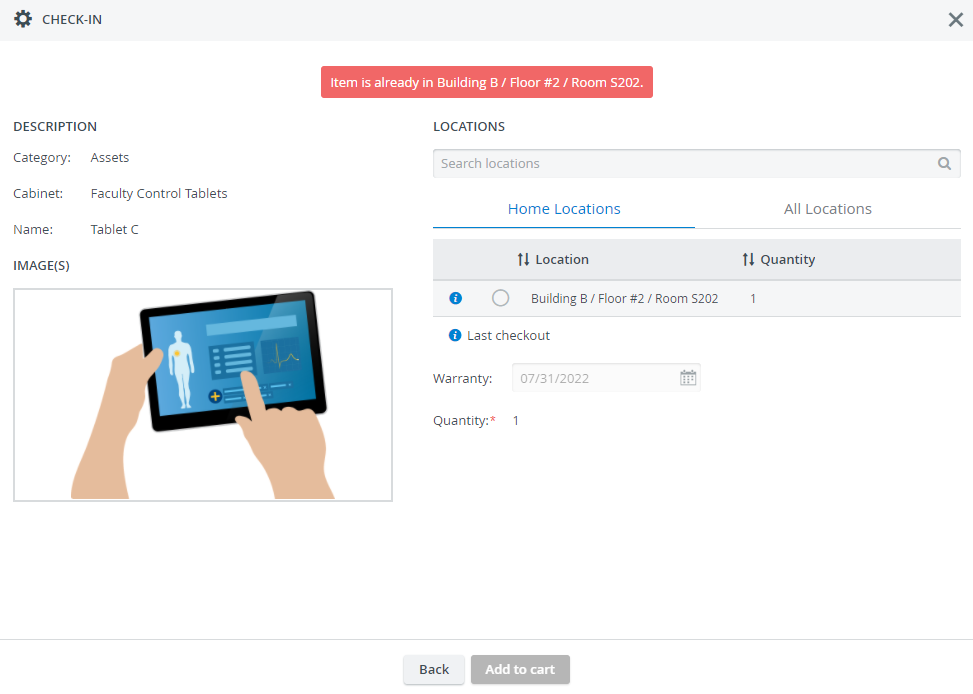
Continue with Add to Cart to create a new cart or add your items to an existing one.
The Back button returns you to the item detection step if there is no cart in progress yet. If you are adding the item to an existing cart, you will land on the Transaction Summary page.
Learn more about How to Finalize Your Transaction in the Cart.
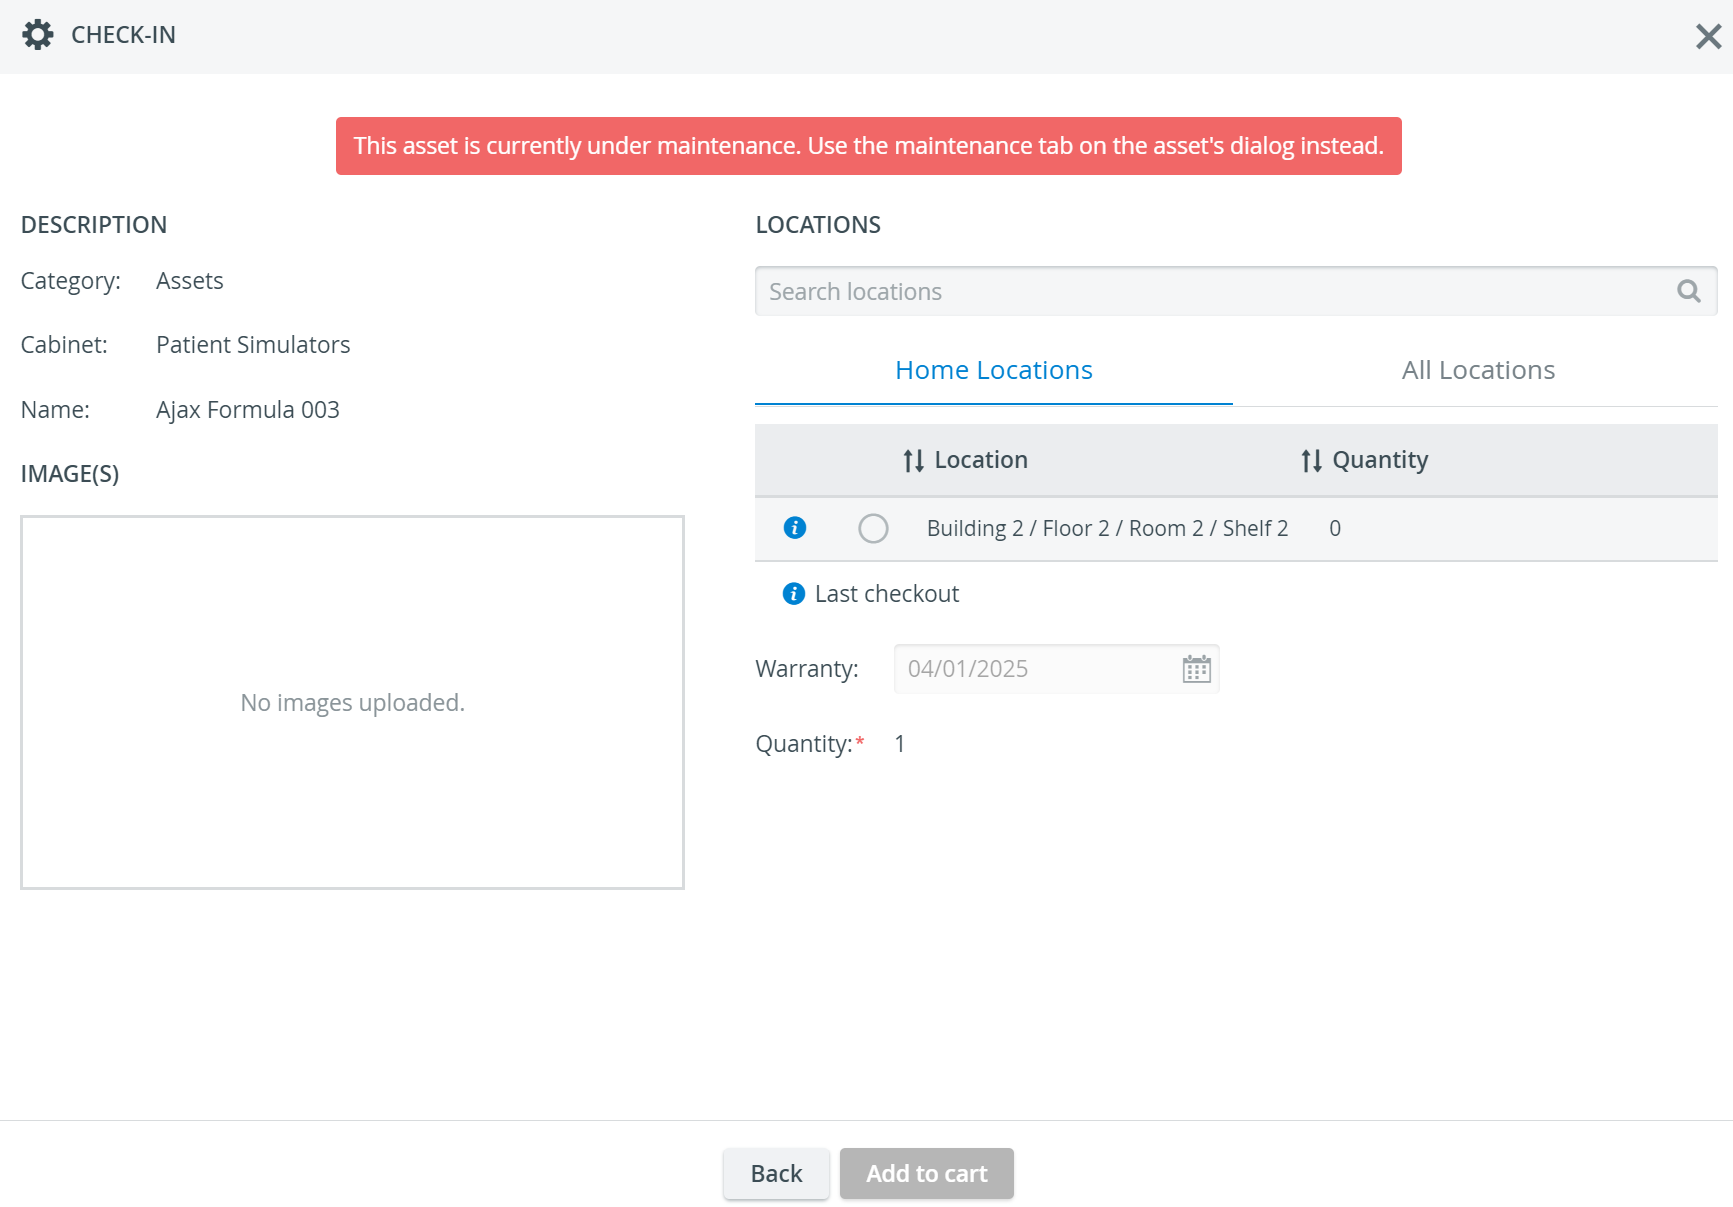
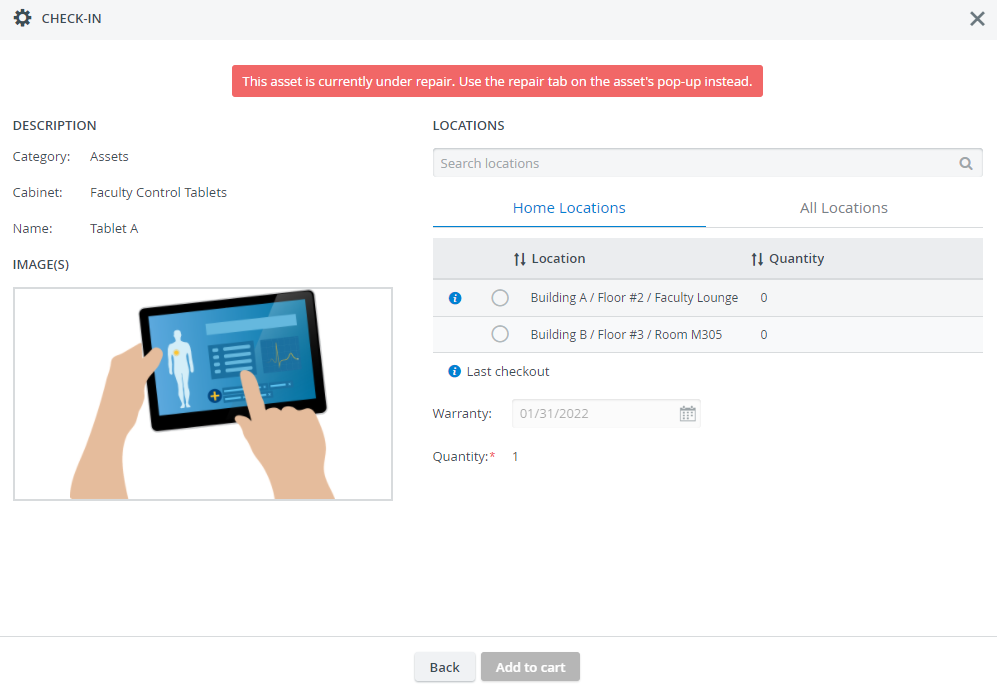
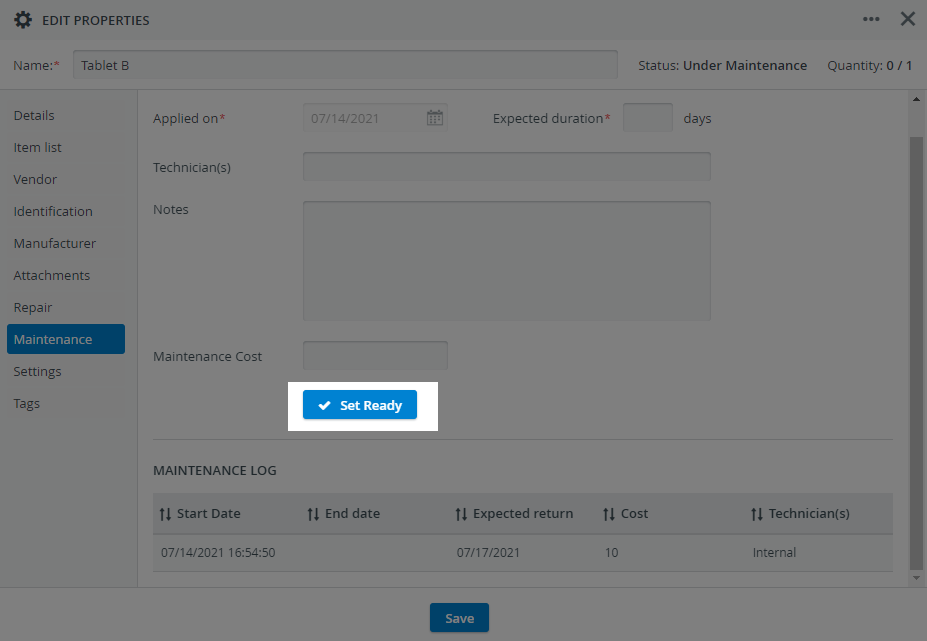
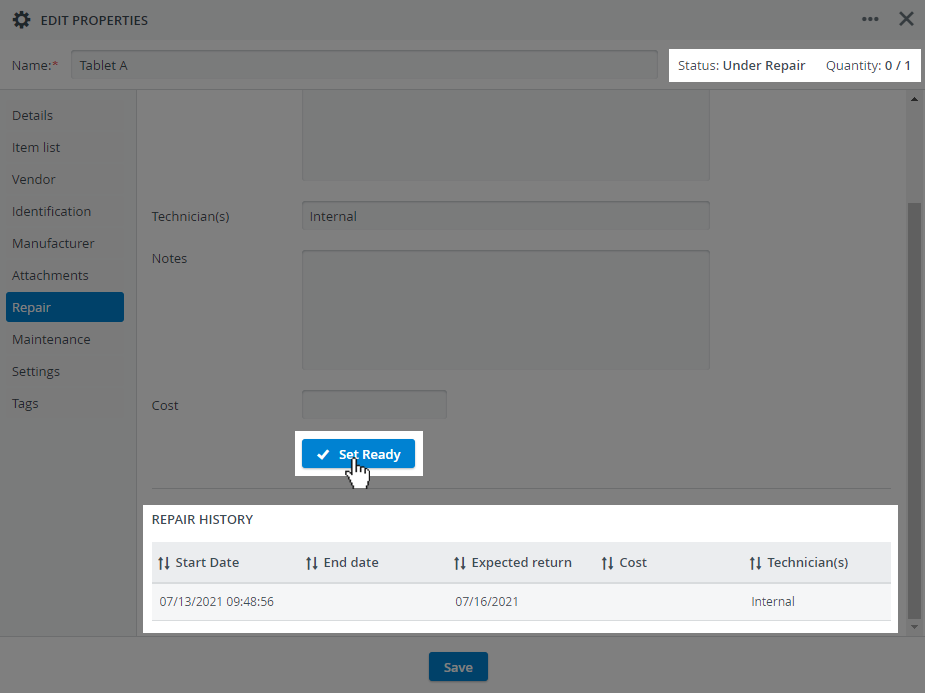
Besides from being On Loan, assets can be sent for Repair, or scheduled for regular Maintenance periods. These statuses are indicated by a black wrench in the Items list on Catalog page.
Assets under maintenance or repair cannot be checked in. Use the Set ready option for returning Assets from Maintenance or Repair.
Overview
Content Tools